Table of Contents
[ Return to Table of Contents]
Database Mapping
Introduction
Database Mapping, a new module of iDocs Version 6.90 (11/28/2017), that supports the user when merging an application overlay (Forms, Check, ACH) with a database directly. The following information is designed to assist the user.
Overview of User's Guide
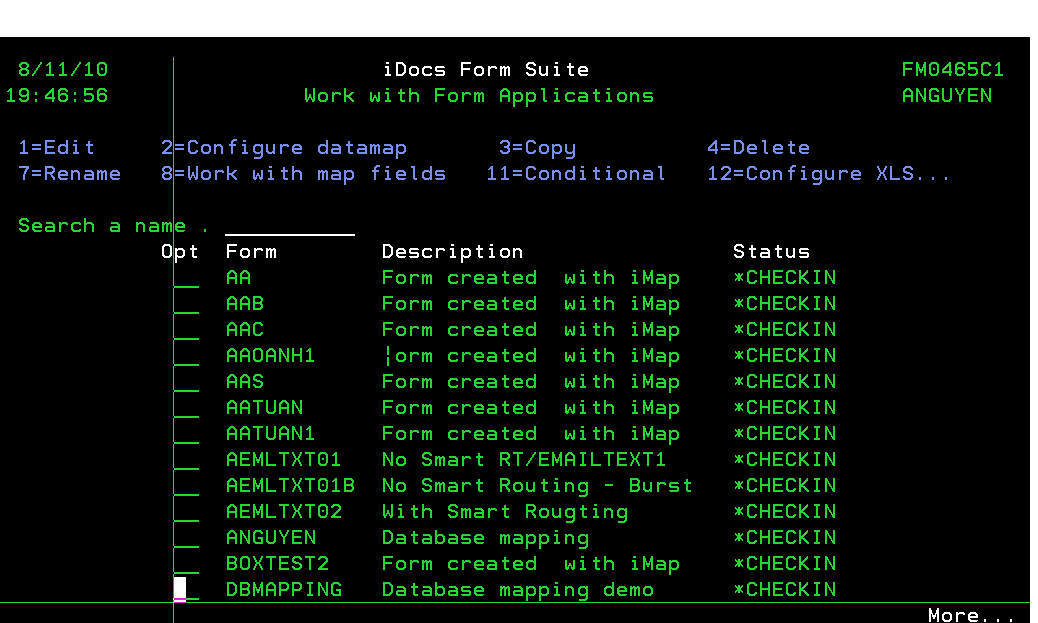
Access to Database Mapping is found within the main menu of the “Work with Form Applications”, “Work with Checks Applications” or the “Work with ACH” applications. Select an option to perform the desired action.
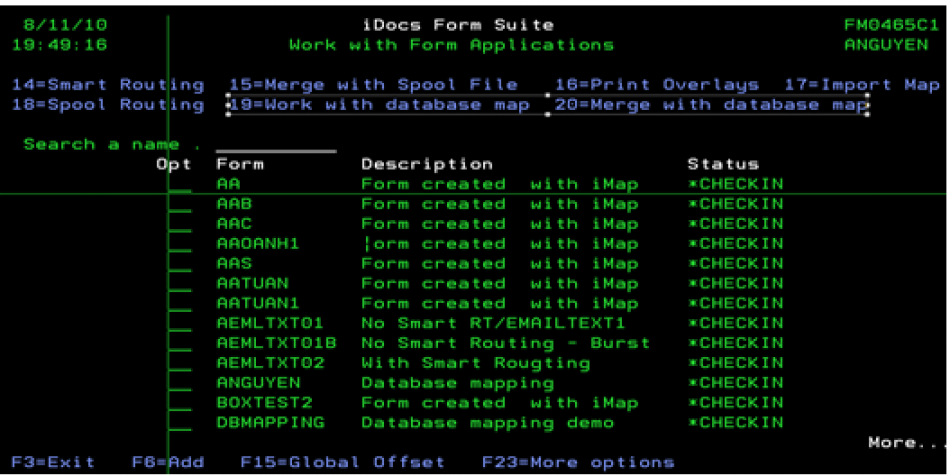
Navigate to the two new Database Mapping options, “19=Work with database map” or “20 Merge with database map” by selecting the “More Options” key, F23.
Work with Database Mapping - Option 19
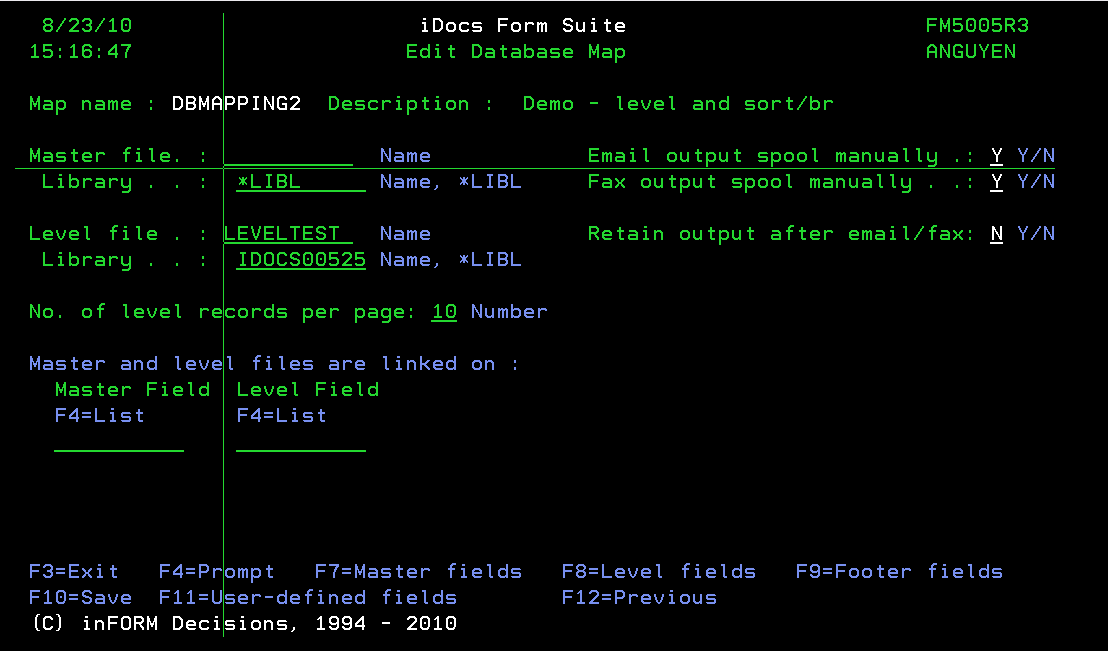
From “Work with …… application” screen, the selection of option 19 opens the ‘Edit Database Map’ screen and its several functions.
Exploring the Edit Database Map Screen
Master file
(Optional) The data contained on the master file will be treated as the header part of the report, and each record will be printed on a spool page.
Level file
(Optional) The data contained on the Level file will be treated as the detail part of the report. You can indicate the number of level records to print on a spool page.
Master Field and Level Field
These fields must be specified if both the Master file and Level file are used. The files are linked by Master Field and Level Field.
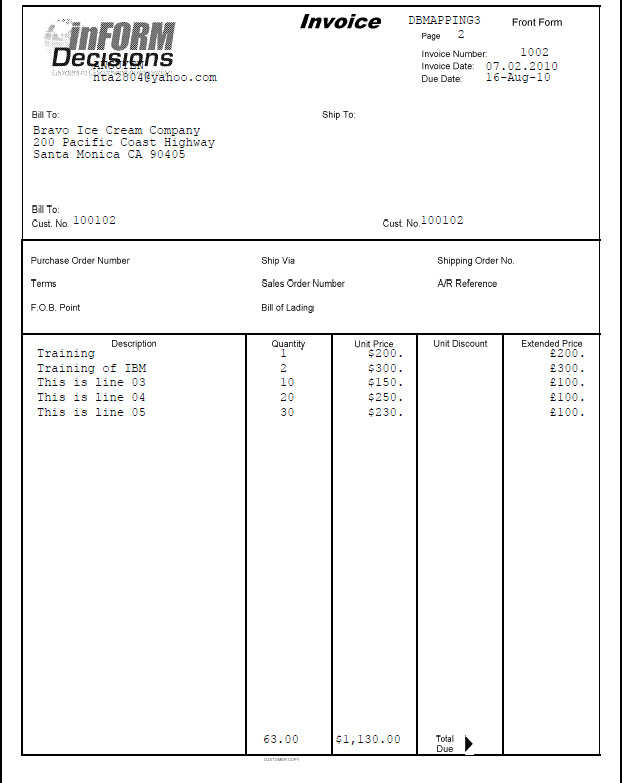
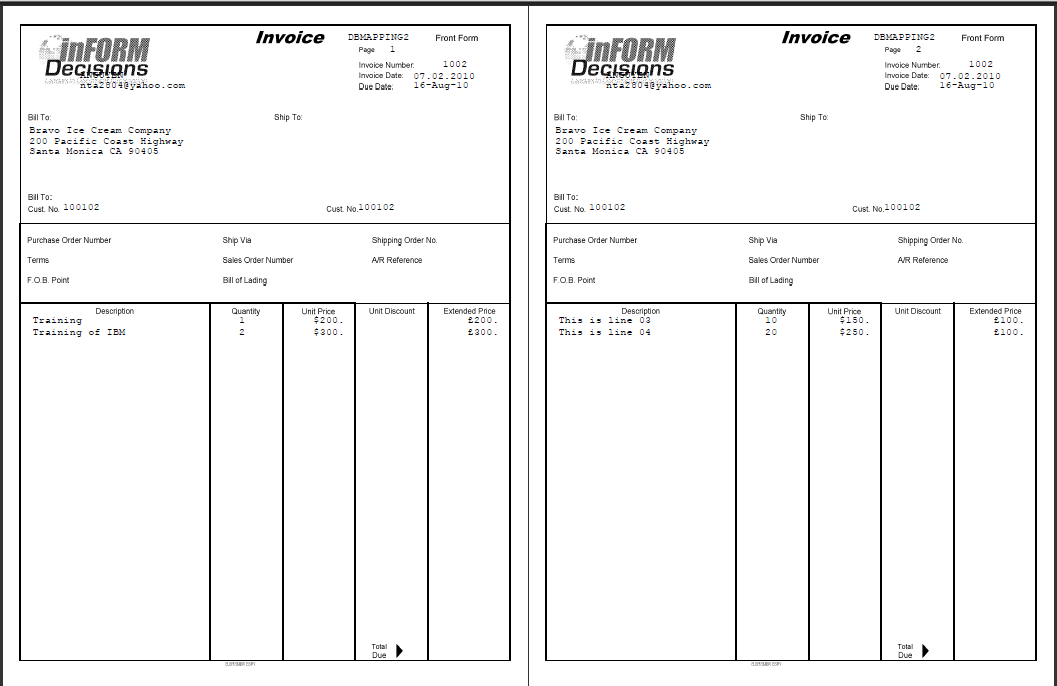
A sample report appear below:
Number of Level Records per Page
This field is used to indicate the number of level records printed on a page. The default value is stored in data structure LVLRECPAG. For example, there are 5 records in the example level file. Since the entered value of the “No. of level records per page” field is 10, all the records will print on one page.
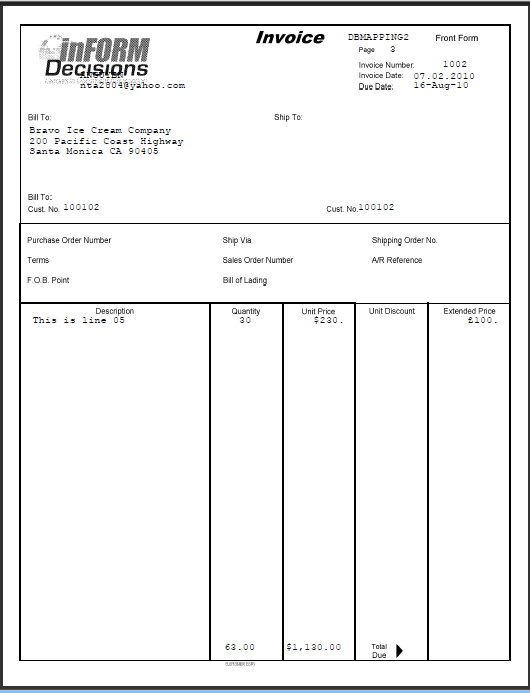
Changing the entered value is 2 would restrict the output to 2 level records per page resulting in 3 spool file pages for a level file containing 5 records:
Note: There is a total of 3 pages, but because the footer data prints only on the last page, footer data is seen on page 3 of this 3 page report (not on pages 1 or 2).
Email Output Spool Manually
If the user wants to email output manually, this indicator should be 'Y' (Yes). After the merge process is complete, a email prompt screen allows the input of an email address and subsequent sending. If bursting is specified, the email prompt screen will display for each part of the bursting process.
Fax Output Spool Manually
This function is just like the manual email output with the exception that an indicator of Y (Yes) will fax the output spool manually and the prompt screen allows the insertion of a fax number.
Retain Output after Email/Fax
This option allows for the retention or deletion of the output spool after it is manually faxed or emailed. A “Y” value in this field will retain the data, while an “N” indicates the output will be deleted after the email or fax is sent.
Working with the Master Field
From the ‘Edit Database Map’ screen, press F7 to open the “Database Field Maintenance screen”.
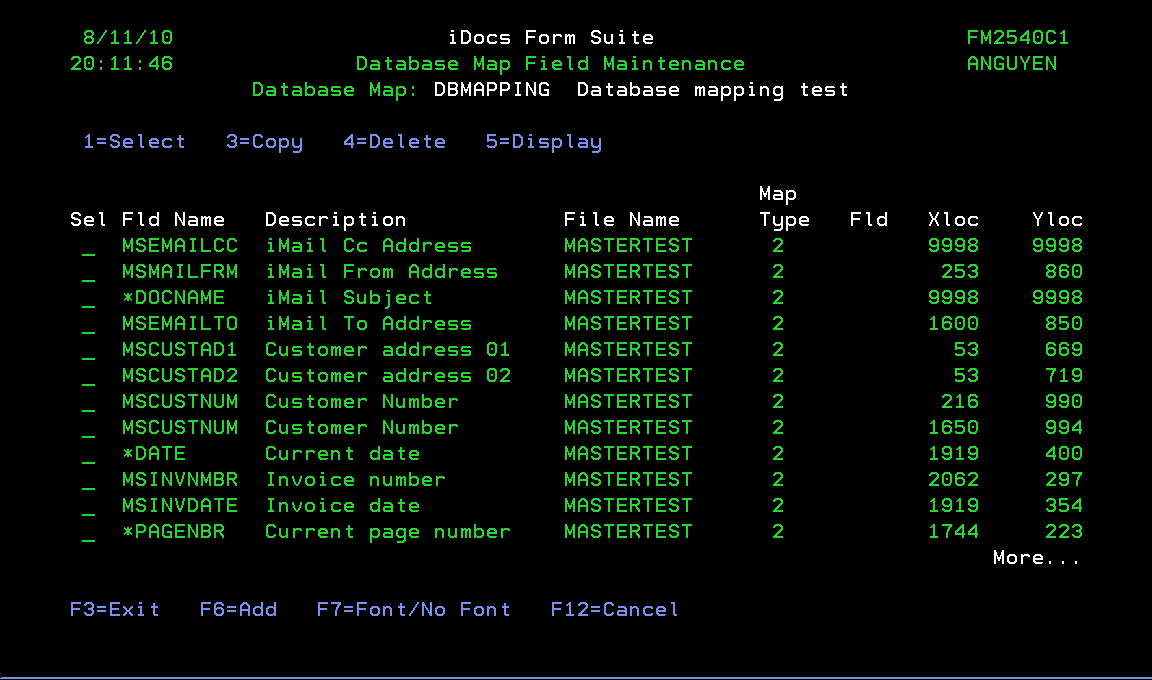
From the Database Map Field Maintenance screen, press F6 to add a new field, or select option #1 to edit an existing field.
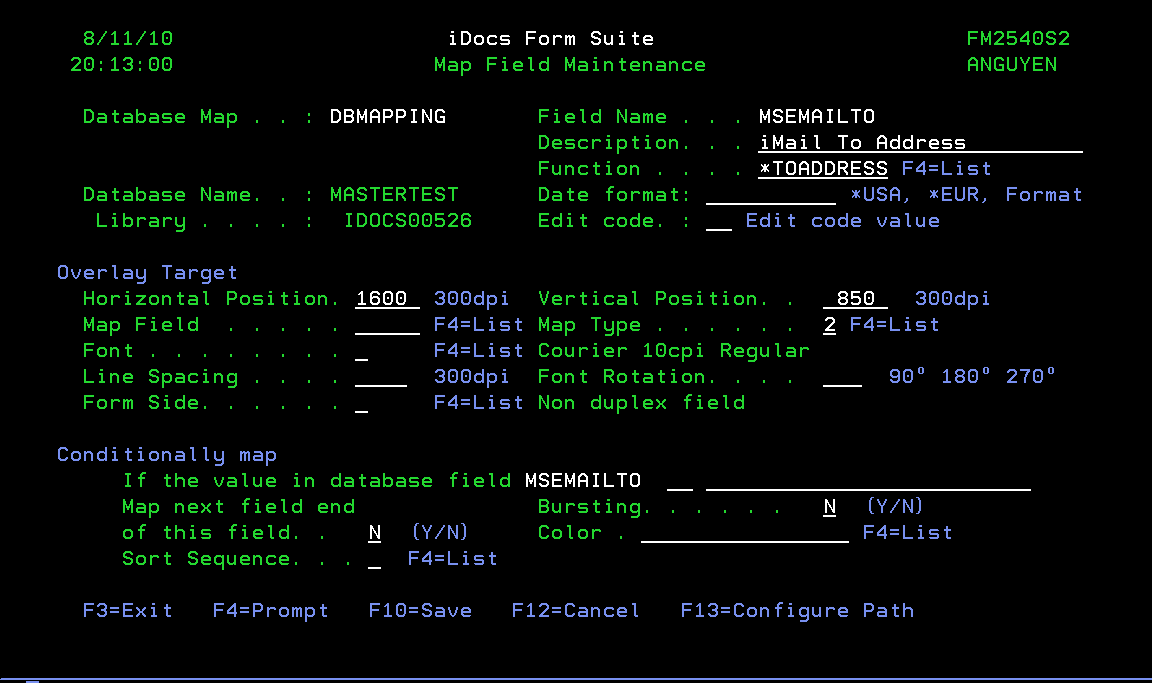
The Map Field Maintenance screen looks similar to the interface of the Spool DataMap Field Maintenance screen, but it no longer uses the From Row, To Row, From Column, To Column fields. New fields Date format, Edit code and Function have been added.
Below is a in-depth explanation of the fields described in the iDocs User Guide.
Date format
This field is used only for a numeric data type field with 8 bytes of length or a data type of L. To identify a numeric field with 8 bytes as a date field, enter a date format. The format options include the US version, MM/DD/YYYY, the European version, DD/MM/YYYY or any other format.
Below is an example of some valid formats for a numeric field with a value of 120110 (1st December 2010):
Output value of DD-MMM-YY = 01-Dec-10
Output value of DD/MM/YYYY (European format) = 01/12/2010
Output value of MM/DD/YYYY (U.S. format) = 12/01/2010
When entering date formats, it is essential to note that ‘DD’ is the convention for day, ‘MM’ or ‘MMM’ is the convention for month, ‘YY’ or ‘YYYY’ is the convention for year, and the date statement separation sign uses multiple options.
Edit Code
To format a field with an edit code, enter the edit code value in the “Edit code” field. Please remember that both ‘Date Format’ and ‘Edit Code’ should not be defined for one field. Only one of them can be applied to a field.
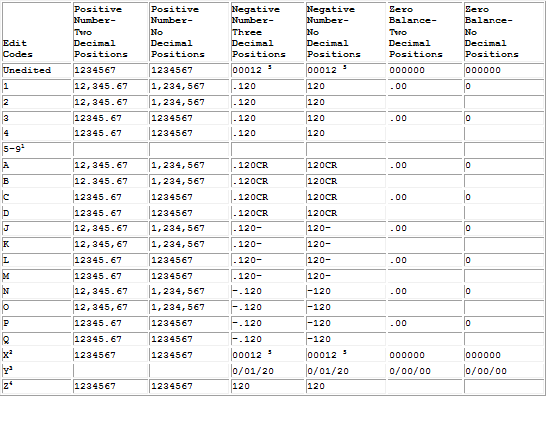
There are 2 characters in this field, the edit value and the prefix character. The first character is an edit value; the valid values are A-D, J-Q, W, Y-Z, 1-9. Please refer to the below example table for some of the edit code formats. For additional information, please go to Summary of Edit Codes at http://www.ibm.com/search/csass/search?sn=mh&q=summary%20of%20edit%20codes&lang=en&cc=us&en=utf.
The second character is used for a prefix character. It also can be a currency sign, like, $, £, ¥, etc.. For example, a numeric field needs to formatted with a dollar sign the second character would be entered as ‘$’. The field has value: N$ - and the output is $12,345.67.
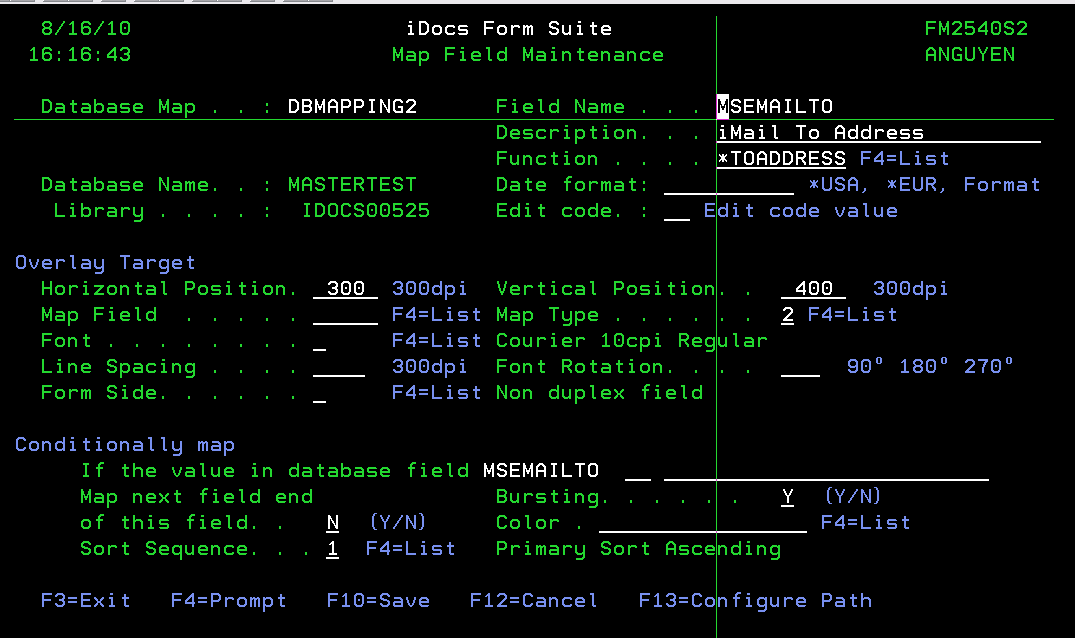
Function
This field is used to indicate a specific function for the field. Press F4 to select a valid value.
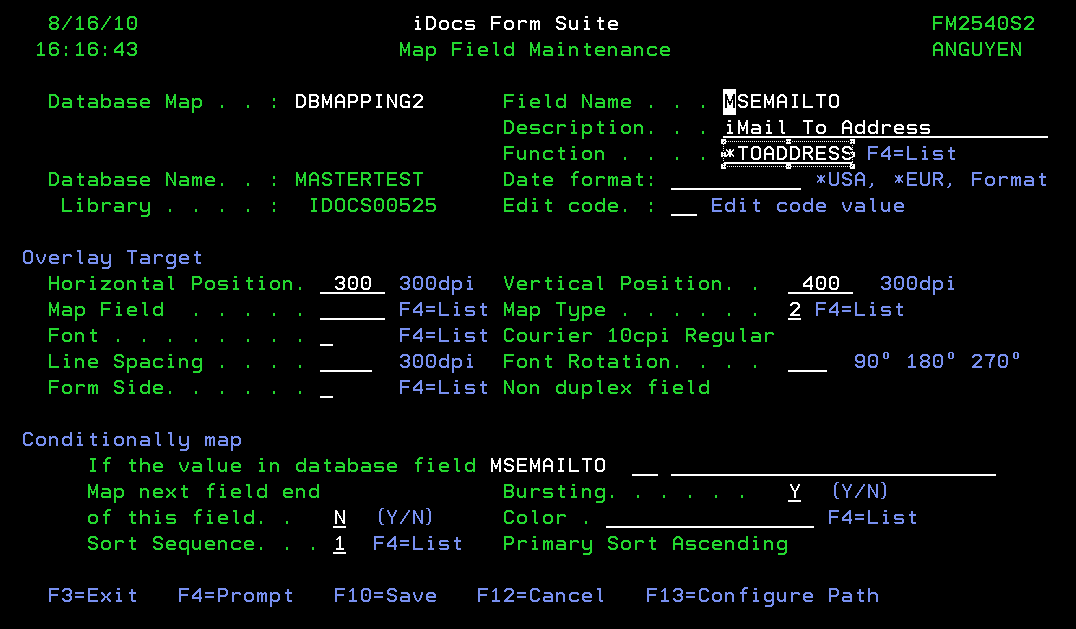
For example, if the function is *TOADDRESS, when you merge the form and output to the output queue *EMAILPDF, an email will be sent to a destination defined by the value of this field.
For more information about available function fields, please refer to iDocs User Documentation.
Note: A field can be defined many times for database mapping with different locations.
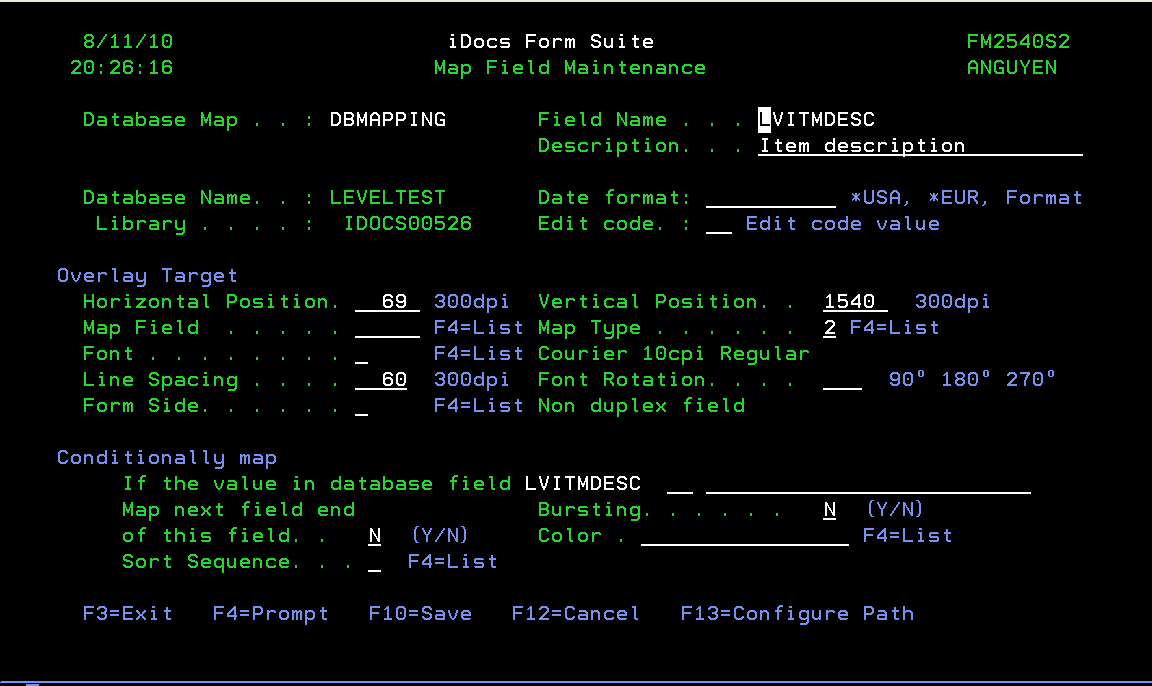
Working with the Level Field
From the ‘Edit Database Map’ screen, select F8 to open the “Database Map Field Maintenance” screen.
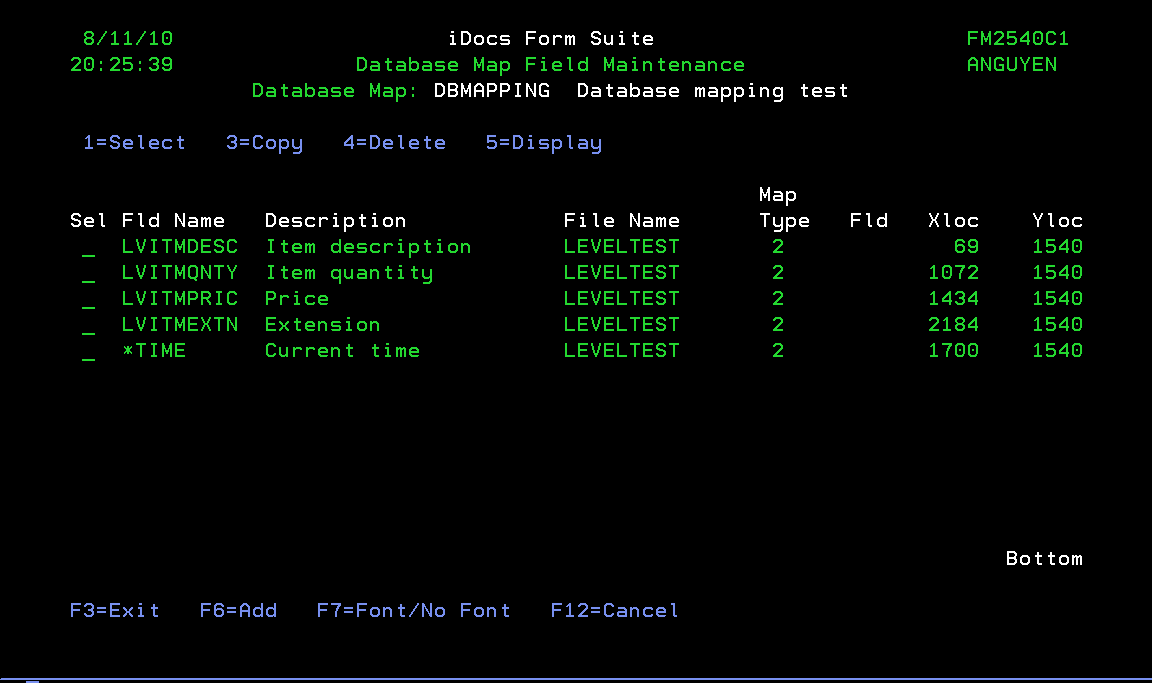
From the Database Map Field Maintenance screen, press F6 to add a new field or select option #1 to edit an existing field.
For the level field, data entry into the “Line Spacing field” is crucial and cannot be skipped since it specifies the space between lines.
The Function field is not available for the level field.
With the other fields, please refer to the “Working with Master Field” section of this document.
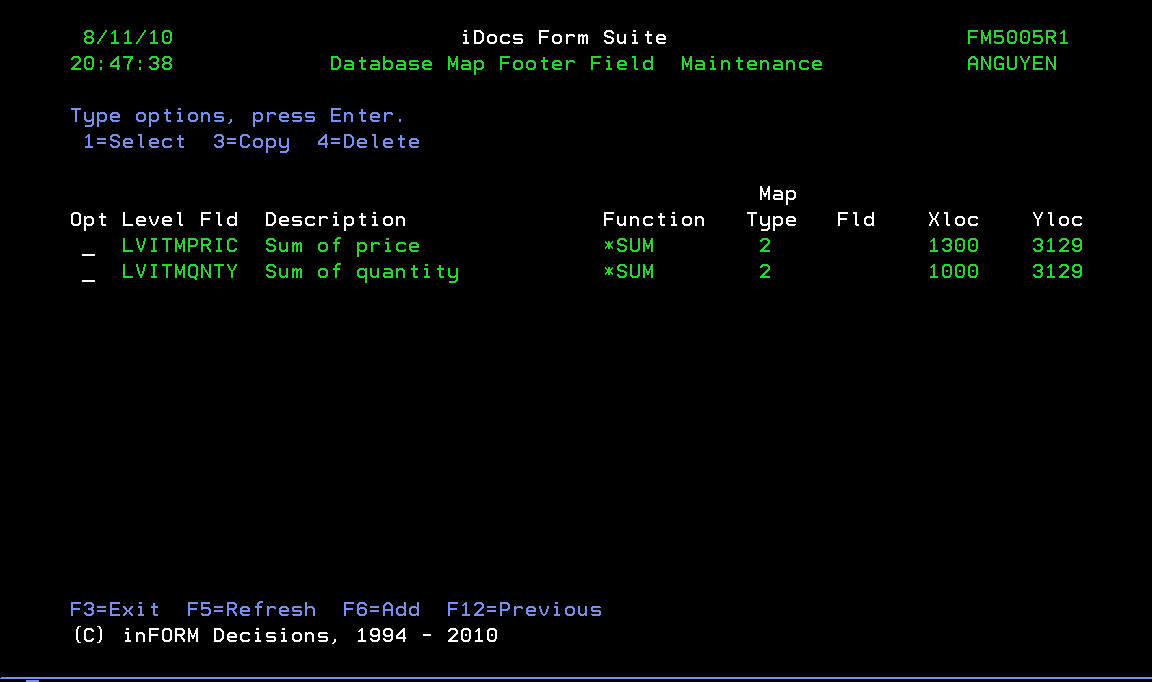
Working with the Footer field
From the ‘Edit Database Map’ screen, press F9 to open the “Database Field Maintenance” screen. Note: The footer fields are available only when the level file is defined for database mapping.
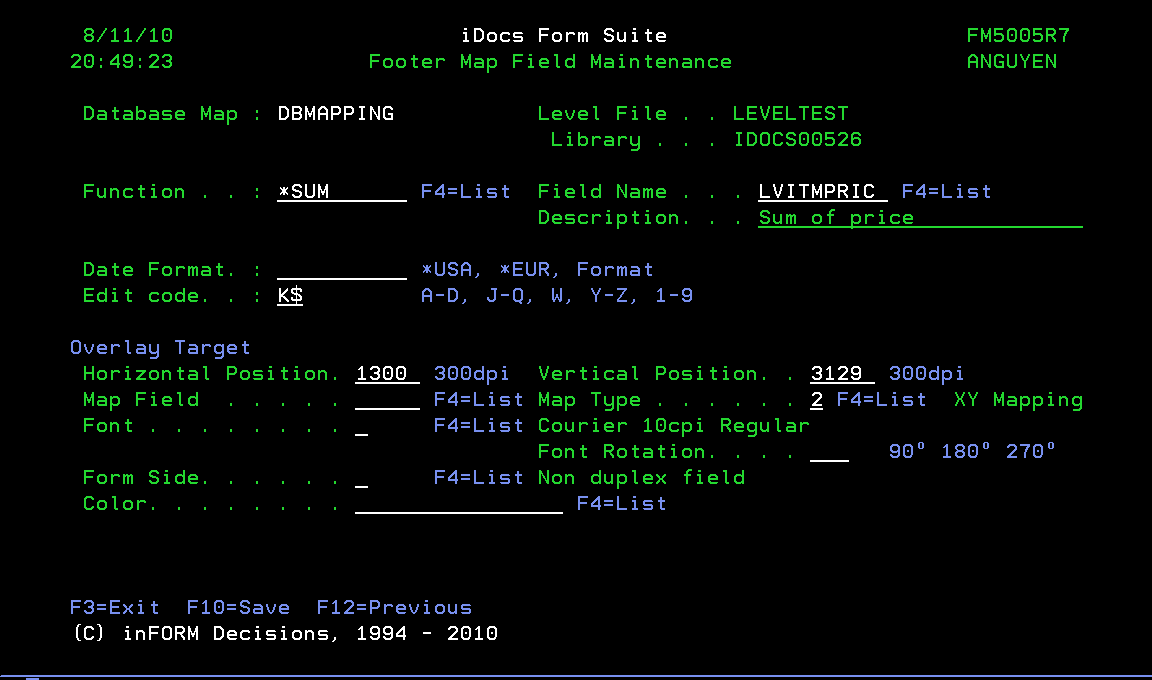
From the Database Map Field Maintenance screen, press F6 to add a new field, or select option #1 to edit an existing field.
The maintenance screen of footer field, allows you to enter a function for one of the level fields. Some useful functions include:
At the 'Field Name' field screen, press F4 to display all the valid level fields within database mapping. Only the level fields defined for database mapping are selectable.
Note: With the footer field, the conditional fields are not available.
Bursting and Sorting
The Bursting and Sorting features are also available for database mapping.
If both Master and Level files are specified, the bursting function will be defined for the Master Field.
Sorting feature recommendations: Specify at least one field to be sorted if the file (master or level) did not define any key field. If sorting is not indicated, the file will be sorted by either key fields or sorting fields.
For example, the following setting will break the output result by the email address field from the database.
Special Fields
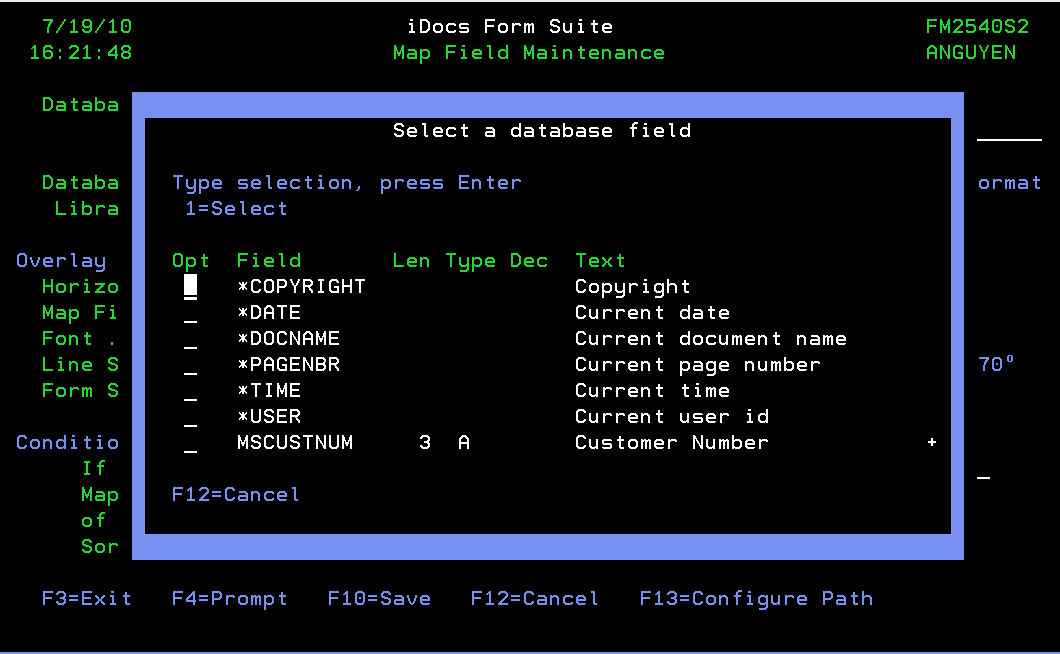
When defining a new field using the ‘Field Name’ field, press F4 to access the pop up window listing database and special fields.
The two types of special fields, built-in and user-defined, are indicated by the “*” prefix.
The built-in special fields from the list above include:
- *DATE: return the current system date. You can format the output value with field ‘Date format’
- *DOCNAME: return the name of a current map.
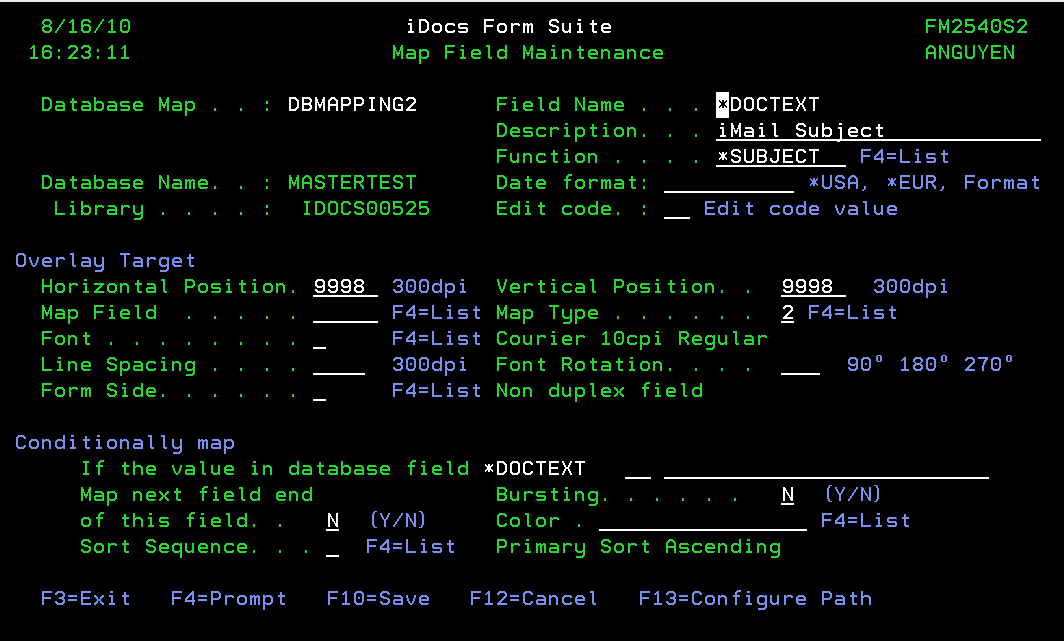
- *DOCTEXT: return the description of a form, check or ACH.
- *PAGENBR: return the current page number. This field is useful when you merge an overlay with a map, and wish to auto number pages.
- *TIME: return the system time with format HH:MM:SS.
- *USER: return the user name of a current job.
- *COPYRIGHT: User defined field. This field will return the value that the user has assigned.
An example of a user-defined special field, a field returning a value assigned by the user, is the *COPYRIGHT option above.
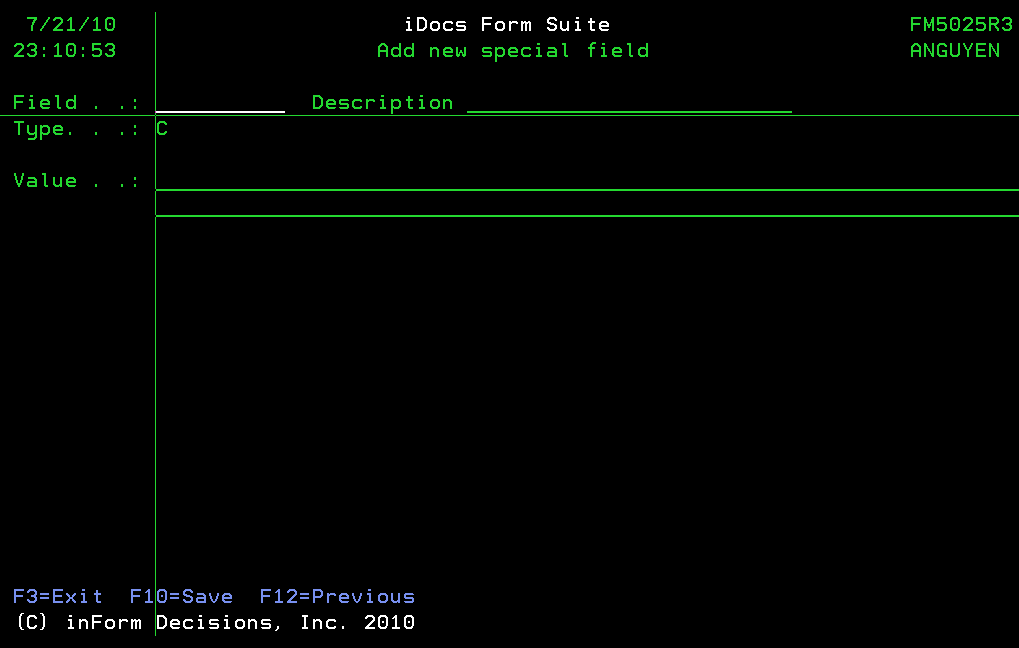
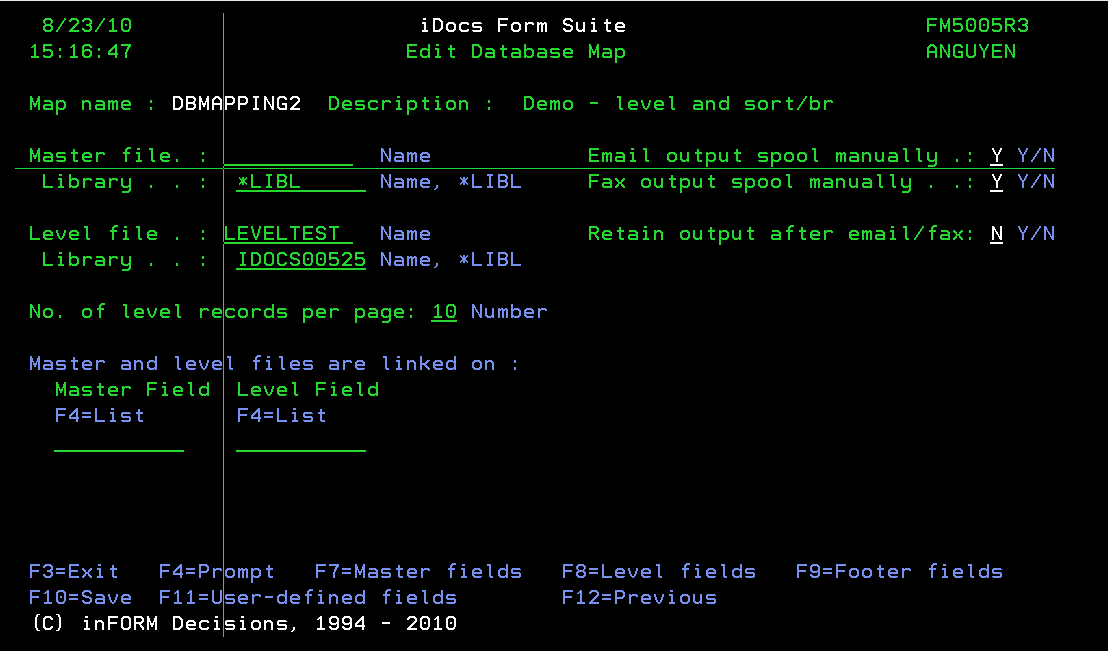 To define a new field press F11 from the ‘Edit Database Map’ screen to open the User-Defined Field screen.
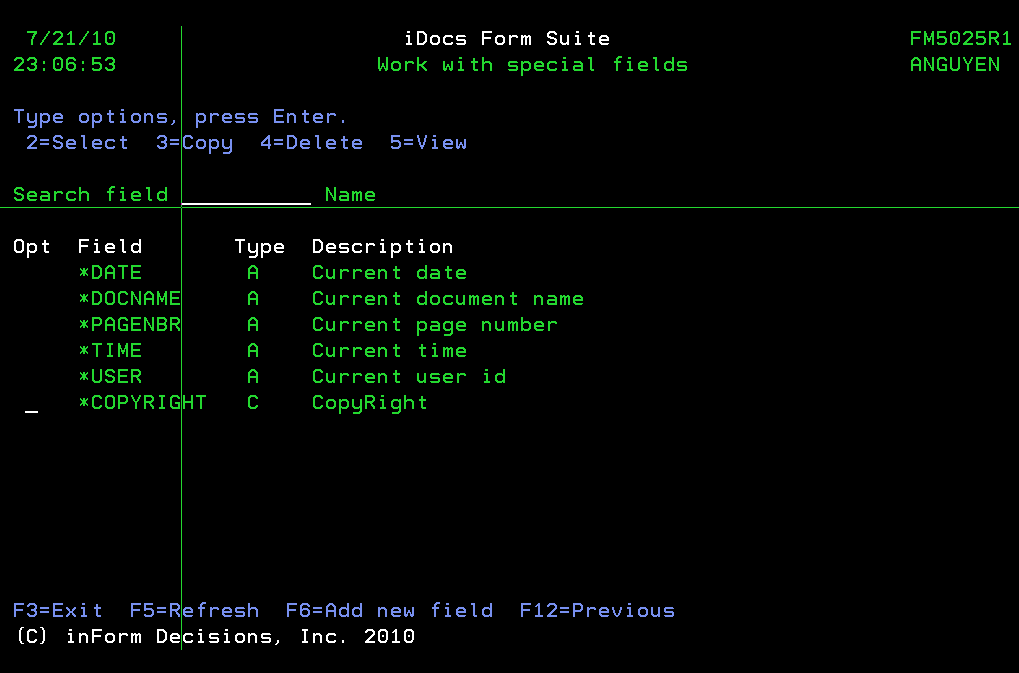
Note: Only User-defined fields are editable or removable in the maintenance screen. To define a new user-defined field, press F6:
Merge an Application with a Database Map
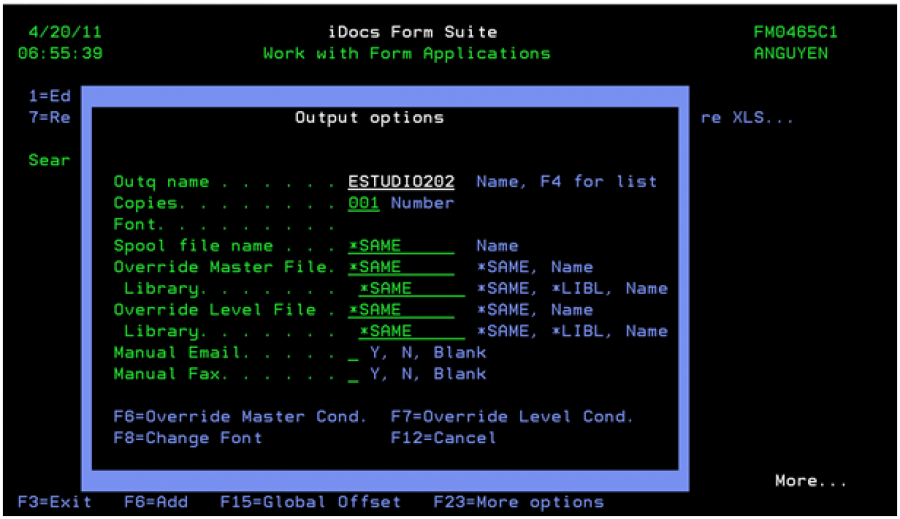
From the main menu of the ‘Work with …’ screen, select option 20 to merge an application with database mapping that is defined. This action is similar to ‘Merge with Spool Mapping’.
Outq name : enter the output queue name
Copies : enter the number of copies
Font : select to change the default font name by press F8
Spool file name : change the default output PCL name (FMGLASER)
Override Master/Level File: If a user wants to change the master file or level file which is defined in form, he can manually input the override file name on these fields.
Manual Email (Fax): there are 03 valid values on these fields
- Blank : use the value of form definition.
- Y : enforce the output PCL is emailed despite the ‘Manual Email (Fax)’ setting in form definition.
- N : enforce the output PCL is ignored to email despite the ‘Manual Email (Fax)’ setting in form definition.
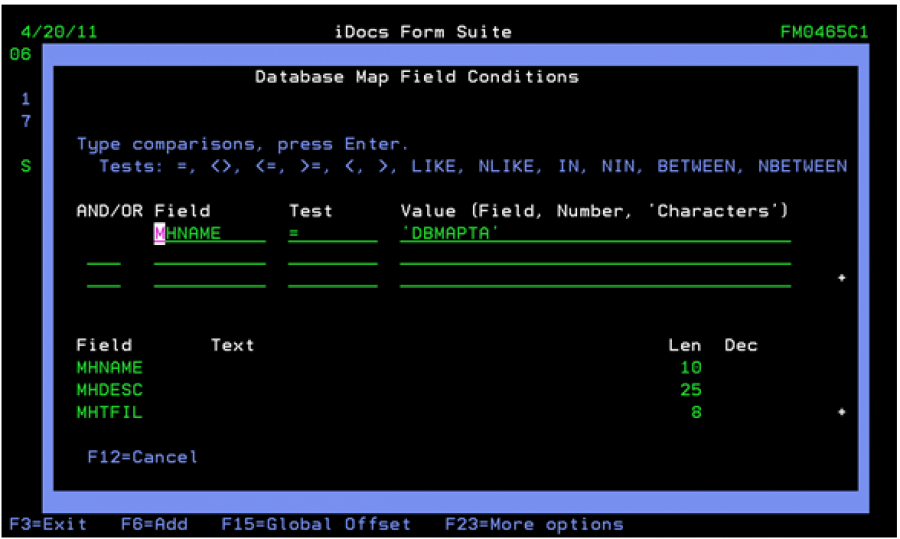
F6=Override Master (Level) Cond: Change the conditional settings (filters) of master (level) file
From the override condition screen, a user is able to see the condition settings of current form and then can override the conditions.
API of merge
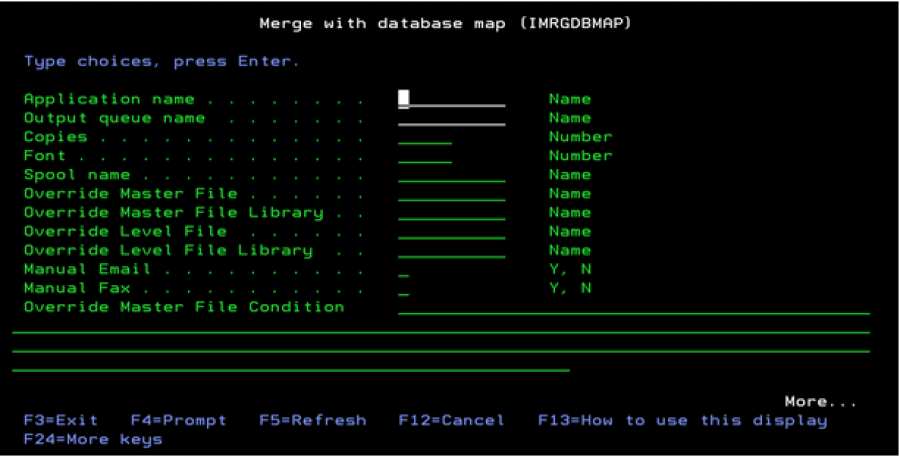
You also can use the IMRGDBMAP command to merge a database map with an application.
The application name can be a form, a check or an ACH name.
Application name : enter the application name.
Outq name : enter the output queue name.
Copies : enter the number of copies.
Font : select to change the default font ID.
Spool file name : change the default output PCL name (FMGLASER).
Override Master/Level File : If a user wants to change the master file or level file which is defined in form, he can manually input the override file name on these fields.
Manual Email (Fax) : there are 03 valid values on these fields
- Blank : use the value of form definition.
- Y : enforce the output PCL is emailed despite the ‘Manual Email (Fax)’ setting in form definition.
- N : enforce the output PCL is ignored to email despite the ‘Manual Email (Fax)’ setting in form definition.
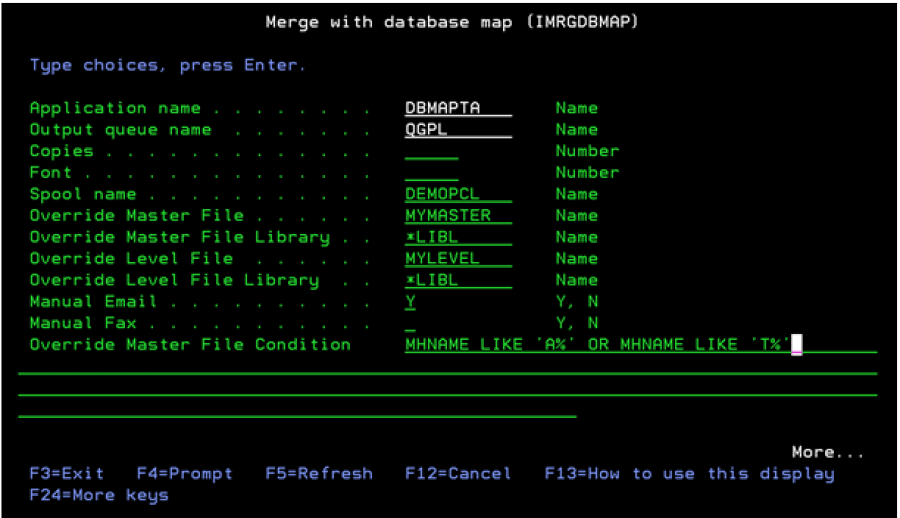
Override Master (Level) File Condition: Change the conditional settings (filters) of master (or level) file by enter a SQL statement, for example
Some Helpful Tips to Define an Application
Tip to define a form to send email after merging.
Indicate at least one master field with the function *TOADDRESS.
Tip to define a form for email output when the email subject is the description of the form.
Define a special field as *DOCTEXT for the form and then indicate the function of that field as *SUBJECT.
