Table of Contents
Remember that the selected language affects sort order and how dates, numbers, and currency are formatted in fill view. See “ Spell Checking Multiple Languages” for information on spell-checking for information on spell-checking a form with multiple languages.
iDocs Procedures
This chapter describes basic iDocs procedures, including the following sections:
- Scanning a Paper Form
- Importing an Image File
- Proofing a Form
- Filling a Form
- Printing a Form
- Importing an Existing Electronic Form
- Searching a Form
- Creating a Form
- Opening a Form
- Mailing a Form
- Saving a Form
- Publishing a Form to the Web
Scanning a Paper Form
This section describes how to use the Scan Form… command to turn your paper form into an electronic form. You can also use the Form Assistant dialog box to scan a form. See “ Using Form Assistant” .
You can scan paper forms directly into iDocs if you have a scanner. Forms should be blank with crisp, dark text for best results. iDocs can scan black- and-white and color forms.
You can use the Sample Form included with your iDocs package as a test page.
To scan a paper form:
- Click the Scan button in the design toolbar or choose Scan Form… in the File menu.
The Scan Form dialog box appears.
- Select Scanner in the Source box.
- If you are scanning a form that contains color (text or background) and you want the color to be recognized, then select the Scan in color check box.
iDocs will not scan or convert forms in grayscale. The scan must be black and white, line art, 300 dpi, *PCX or *TIF images only.
- Click Set Up Scanner… to choose a page size and adjust scanning brightness.
- Select an option under Page Size.
Select Letter if the form is 8.5 by 11 inches.
Select Legal if the form is 8.5 by 14 inches.
Select A4 if the form is 21 by 29.7 centimeters (European). - Select how light or dark the scanned image will be under Brightness.
Select Lighten if the form has very thick or run-together text, or if the background is smudged, shaded, or colored.
Select Normal if the form has crisp, black text and objects are on a white background.
Select Darken if the form has very thin or broken text such as a poor- quality fax or a copy of a copy.
- Click OK to return to the Scan Form dialog box.
- Select an option in the Orientation drop-down list.
- Select Auto to have iDocs determine orientation automatically.
- Select Portrait for a vertically oriented page.
- Select Landscape for a horizontally oriented page.
- Select Flipped to automatically rotate a portrait page 180 degrees during the scan.
- Select Flipscape to automatically rotate a landscape page 180 degrees during the scan.
The Flipped and Flipscape options are useful for scanning pages in a book that needs to be turned upside down or sideways.
- Select import options under the Settings options.
- Select Auto Form Design to use Logical Form Recognition in order to recognize text and fillable fields in the form.
- This gives you full control over a form’s design.
- Deselect Auto Form Design to scan a form without recognizing form design. Text and fillable fields are not recognized.
This is useful if you just want to print or mail a form, or if the form is of such poor quality that it would cause recognition problems. - Select Auto Form Straightening to have iDocs automatically straighten a crooked page.
This is useful if you scan a page in a large, unevenly cut, or thick document that is difficult to position correctly.
Select Add Page(s) to Current Form to make the newly scanned page the next page in the current form.
This option is only available if a form is open.
- Click Options… in the Scan Form dialog box and then click the Recognition tab to set recognition options for your form.
- Select Allow Multiple Languages if you have a form with multiple languages and you want iDocs to recognize more than one language.
This setting does not affect the language setting in the International tab. Do not select this setting for a single language form because optical character recognition (OCR) may not be as efficient. - Select Find Calculations automatically if your form has calculations and you want iDocs to recognize the calculations.
- Select Find Hyperlinks automatically if your form contains hyperlinks and you want iDocs to recognize the hyperlinks.
This option is only available if you are importing a form. - Select Detect paper color automatically if your form’s background has color and you want iDocs to recognize the color during OCR. If you deselect this option, the form’s background will be detected as white.
- Select Show Proofreader after recognition to open the Proofreader After your form has been recognized. See “ Proofing a Form” for more information.
- Click Font Mapping… to open the Font Mapping dialog box. In this dialog box you select options to retain the font characteristics of your form during OCR.
Select the fonts you want mapped to each font type and click OK when you are done. - Click Options… in the Scan Form dialog box and then click the International tab to make sure the appropriate language is selected. If you need to change the language for your new form, select an option in the Language drop-down list.
See “International Settings” for more information on international options.
Click OK to return to the Scan Form dialog box. - Click OK in the Scan Form dialog box to begin scanning.
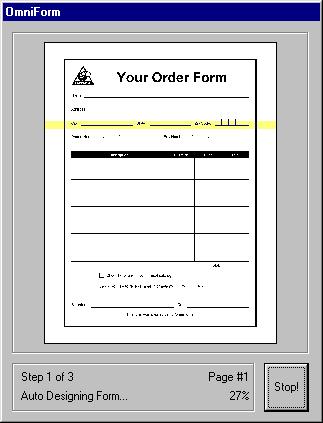
iDocs scans the form. The iDocs window displays the scanning, designing, and straightening progress if you selected those options.
If your scanner does not allow you to stop the scanning process, then the Stop button will be grayed out.
How your form appears depends on whether or not you chose Auto Form Design in the Scan Form dialog box.
- Click the Save button in the design toolbar or choose Save… in the File menu to name and save your file.
Color forms generally use more memory than black-and-white forms. If you are scanning a color form and are concerned about the amount of memory you might use, do not save your color form image with the file. Choose Save As… in the file menu, name your file, and deselect Save original form(s) with form file. Click Save to save your file.
If you have selected Show Proofreader after recognition, the Proofreader window appears to the left of the main window. For more information, please see “Proofing a Form” .
- Begin to edit or fill your form.
See “Designing a Form,” for detailed information on defining, moving, resizing, and creating fields, as well as other design functions
See “Filling a Form,” for detailed information on the kinds of fields you may find on a form and how to fill them.
Importing an Image File
This section describes how to use the Scan Form… command to import an image file as a recognized iDocs form. You can also use the Form Assistant dialog box to import a form. See “ Using Form Assistant”.
iDocs can import and recognize black-and-white and 24-bit color forms in either PCX or TIFF format. Image resolution must be 200, 300, or 400 dots per inch (dpi) for black-and-white forms, and 300 dpi for color forms. If you have a fax modem, for example, you can receive a faxed form and use the fax program’s software to save the file in PCX or TIFF format. iDocs offers the same import options for image files as it does for scanned forms.
To Import an image file as a form:
- Select Image File(s) in the Source box to recognize a form in a supported image format.
- Click Select Files.
The Select Files dialog box appears. - Locate and select a file. This could be a form created in another program or one received as a fax file.
- Click Add File to add the file to the Files to Process list box.
- Click OK to return to the Scan Form dialog box when you are done.
- Follow steps 5 through 8 in the preceding section, “To scan a paper form:”
- Click OK.
iDocs imports the form. The iDocs window displays the scanning, designing, and straightening progress if you have selected these options.
How your form appears depends on whether you chose to have iDocs design the form during import. - If you have selected Show Proofreader after recognition, the Proofreader window appears to the left of the main window. For more information, please see “ Proofing a Form”.
- Begin to fill or edit your form.
See “Designing a Form,” for detailed information on defining, moving, resizing, and creating fields, as well as other design functions.
See “Filling a Form,” for detailed information on the kinds of fields you may find on a form and how to fill them.
Proofing a Form
After you scan or import an image file, you can use the Proofreader option to make improvements to your form. If you have selected Show Proofreader after recognition, the Proofreader window appears to the left of the main window immediately after you scan or import a form.
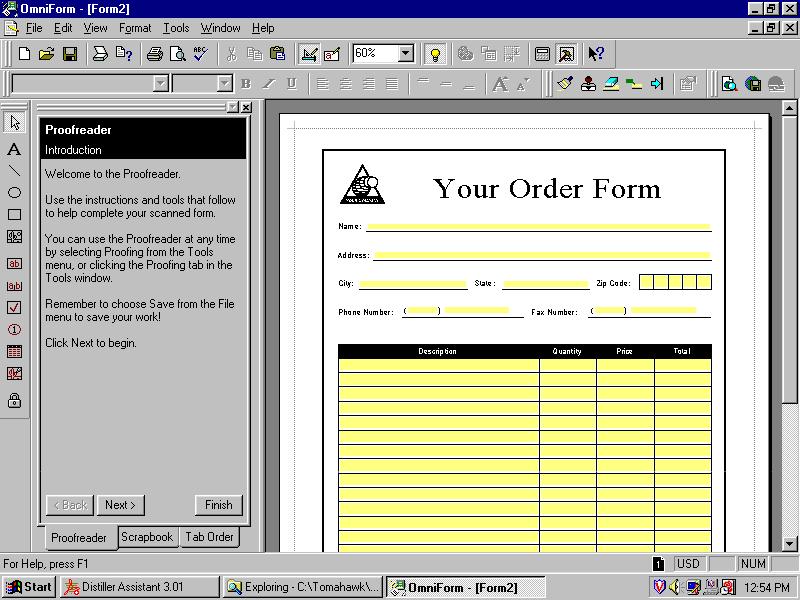 If the Proofreader does not appear, choose Proofreader in the Tools menu.
If you do not want the Proofreader window to appear, you can turn it off. Choose Options… in the Tools menu and click the Recognition tab. In the Recognition tab, deselect Show Proofreader after recognition.
To begin proofing:
- Click Next> in the Proofreader window and follow all instructions in the panels that appear.
- Click Finish to display the Proofreader Index panel.
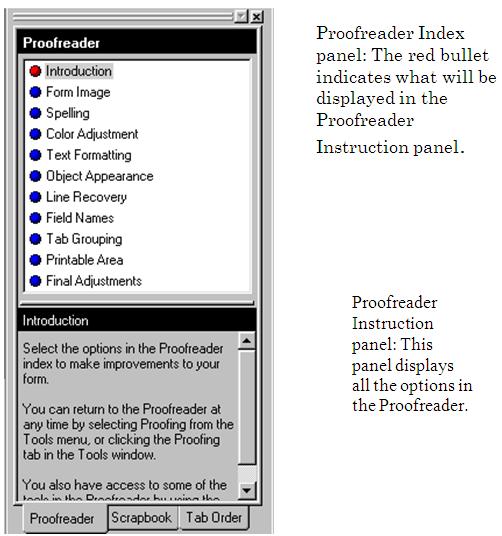
The following Proofreader window appears
This window displays all the options in the Proofreader. Click a bulleted topic in the Proofreader Index panel to display that section in the Proofreader Instruction panel.
 To close the Proofreader window, click the Tools button in the design toolbar.
Or, click the X button in the upper-right corner of the Proofreader window.
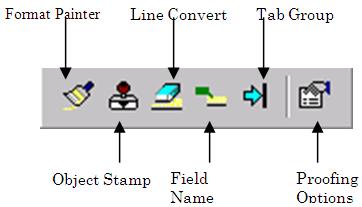
The Proofing Toolbar
Use the proofing toolbar to edit your form. To view the proofing toolbar, select Toolbars in the View menu and then select Proofing in the drop-down menu. Or, click the Toolbar button in the Final Adjustments Instruction panel.
If you would like to keep this toolbar on your desktop, see “ Customizing Toolbars” for more information. See the online help or the panels in the Proofreader for more information about how to use this toolbar.
Filling a Form
This section describes how to fill a form. You can also use the Form Assistant dialog box to fill a form. See “ Using Form Assistant”.
To fill a form:
- Click in a field to place the cursor in the first field.
- Type the information you want to enter.
- Press the Tab key to move to the next field.
Press Shift-Tab to move to the previous field. - Continue to fill fields in this way.
See “Filling a Form,” for more information.
Printing a Form
This section describes how to print a form and import forms from other applications. You can also use the Form Assistant dialog box to print a form. See “Using Form Assistant”.
Before you Print Your Form
Before you print your form, you can use the Page Setup dialog box to select the paper size, margins, orientation, and color. To change the color of your form, see “ Adding Color to a Form”. You can print forms with different page sizes, margins, orientations (portrait and landscape) and color.
To set up your form for printing:
- Choose Page Setup… in the File menu.
The Page Setup dialog box appears. - In the Page Setup dialog box select/fill in your options for Paper, Orientation and Margins.
- Select an option in the Apply to drop-down list.
- Select Current page only to have your selections apply to only the current page.
- Select Current page forward to have your selections apply to the current page of your form and all subsequent pages.
- Select All pages to have your selections apply to all the pages of your form.
- Click OK to apply your options and close the dialog box.
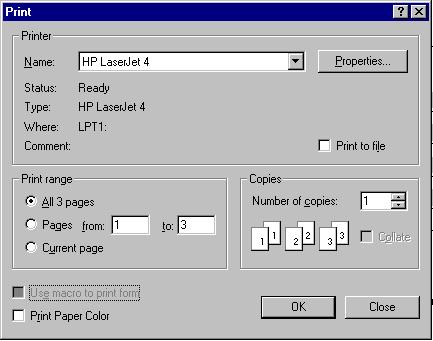
To Print a blank Form
- Select Print Paper Color if you want to print the background color of your form.
- Select any other print options desired.
- Click OK.
iDocs prints your form with the selected settings.The Print to File dialog box appears after you click OK if you have selected the Print to file option in the Print dialog box. Select a location for the file, type a file name in the File name text box, and click OK.
Importing an Existing Electronic Form
iDocs has a useful feature to import documents from other programs within Windows. Using Print to OmniForm driver, you can print an electronic form (created from any Windows application) to iDocs. iDocs adds the OmniForm driver as a printer to the Windows Printer Group during installation. If you do not have this feature, reinstall iDocs and make sure that the Print to OmniForm Support option is selected in the Additional Components dialog box. Then, use the following instructions:
To print your form to iDocs:
- Open the form in the application in which it was created.
Remove any colored or shaded background from the form. - Choose Print in the File menu.
- Select OmniForm in the Name drop-down list.
- Click OK.
iDocs automatically scans in the form. The iDocs window displays the scanning progress of the form. Your form opens in iDocs. To make any corrections to the form, see “Designing a Form.”
Searching a Form
This section describes how to perform a search on a form. You can also use the Form Assistant dialog box to search a form. See “ Using Form Assistant”.
To search a form:
- Choose Search… in the Records menu.
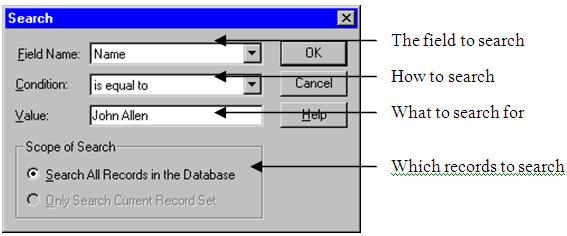
The Search dialog box appears
- Select the field to search in the Field Name drop-down list.
- Select how to search for the information in the Condition drop-down list.
- Type the information to find in the Value text box.
- Select which records to search.
- Select Search All Records in the Database to search all records in the current database.
- Select Only Search Current Record Set to search the current found set of records. This option is only available after a search.
- Click OK.
iDocs searches the records and finds any that contain the information you specified.
See “ Searching Record for Information” for detailed information on searching.
Creating a New Form
This section describes how to create a new form. You can also use the Form Assistant dialog box to create a new form. See “ Using Form Assistant”.
See “Designing a Form” for detailed information on form design.
To create a new form:
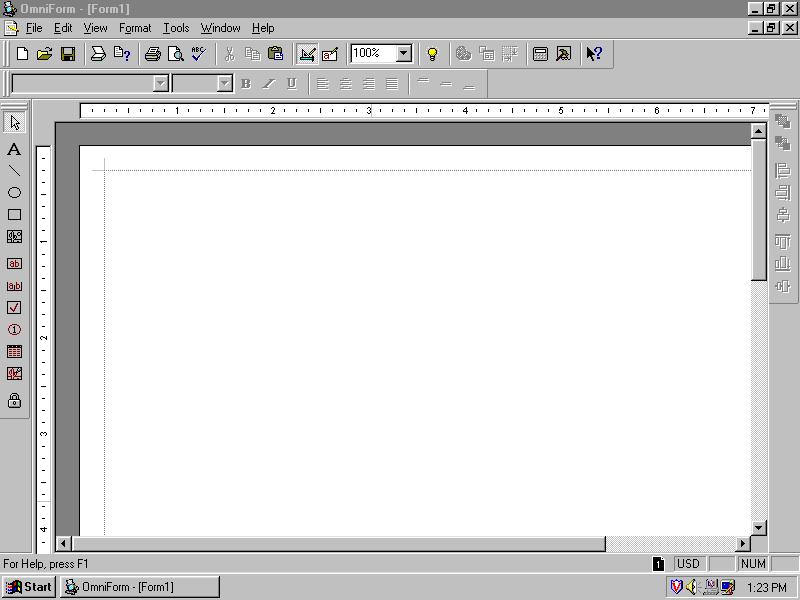
- Use the design view tools to create fields and objects on your new form.
Opening a Form
This section describes how to open a form.
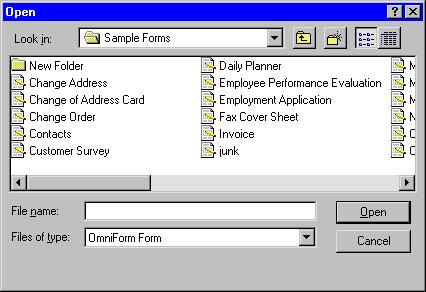
To open a form:
- Click Start in the Taskbar and choose ProgramsinFORM Decisions flashFORM 5.0.
Click Cancel in the Form Assistant dialog box if it appears.
- Make sure iDocs Form is selected in the Files of type drop-down list.
- Locate and select a file.
- Click Open.
The form opens in the last view in which it was saved: design or fill. You can switch the view if you wish.
Mailing a Form
This section describes how to select a mail system and mail a form from iDocs.
You must have either Lotus cc:Mail (2.0 and above)/Lotus Notes or Microsoft Exchange/Outlook installed to mail a form.
To select a mail system:
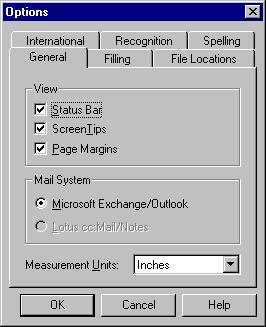
- Choose Options… in the Tools menu in either fill or design view. The Options dialog box appears.
- Click the General tab and select an option under Mail System.
Select either Lotus cc: Mail/Lotus Notes or Microsoft Exchange/ Outlook.
iDocs selects your installed mail application by default if you have only one installed. - Click OK.
To send a form:
- Open or scan in the form that you want to send.
 Click either the design or fill view button in the design toolbar. (You can also choose Design or Fill in the View menu.) In design view you have two options: you can send only the form or send the form as a mailable filler. In fill view you have several options: you can send only the form, only the data, form and data, or send the form as a mailable filler.
- Choose Send in the File menu.
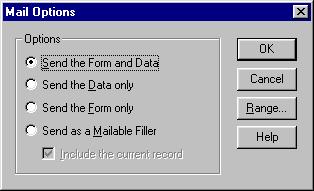
The following Mail Options dialog box is for fill view.
- Select an option.
- Select Send the Form and Data to send all text, graphics, and any information in fillable fields. This option is available only in fill view.
- Select Send the Data only to send just the information you have typed in the fillable fields. This option is available only in fill view.
- Select Send the Form only to send the form as it would appear in design view, without any information in the fillable fields.
- Select Send as a Mailable Filler to send the current form and have it filled out by a user who does not have iDocs.
- Select Include the current record to include the current record that you have open. This option is available only in fill view.
- If you are in design view or you are sending a mailable filler, proceed to step 8.
- If you are in fill view and not sending a mailable filler, you can also specify a range of records to send.
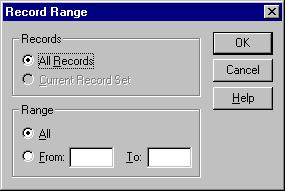
Click Range… to open the Record Range dialog box and specify a range of records to send.
If you do not specify a range, iDocs will send all records by default.
- Specify a range.
- Select All Records to send all records in the current database.
- Select Current Record Set to send the current found set of records. This option is available after a search.
Type the first record number to send in the From text box and the last record number to send in the To text box to specify a range of records.
- Click OK to return to the Mail Options dialog box.
- Click OK in the Mail Options dialog box.
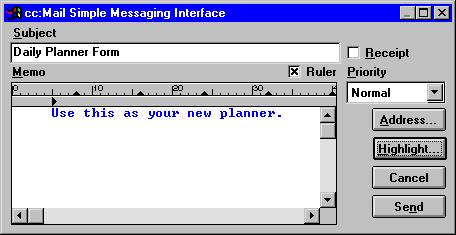
A dialog box with your mail application program (either Lotus CC: Mail/Notes or Microsoft Exchange/Outlook) appears. - Enter the information in your mail program’s dialog box. Refer to your mail program’s documentation for more information.
The following box shows the Lotus CC: Mail application dialog box.
- Click Send to mail your message and form as specified.
Adding a Routing Slip
Microsoft Exchange/Outlook users can add a routing slip to mail. See the Microsoft Exchange/Outlook documentation for detailed information.
To add a routing slip:
- Open or scan in the form to send.
- Choose Add Routing Slip… in the File menu.
The Add Routing Slip dialog box appears. - Select the recipients and other routing information.
- You can either send the document now or later.
- Click Route to route the document.
- Click Add Slip to close the dialog box without routing the form.
Saving a Form
This section explains how to save your form and how to use the Save As… and Save As Mailable Filler… commands. You can save your form in a variety of formats.
To save your form:
To save your form in various formats:
- Choose Save As… in the File menu.
The Save As dialog box appears. - Select an option from the Save as type drop-down list.
- Select iDocs Form to save to iDocs’s default format.
- Select iDocs 3.0 Form to save to iDocs’s 3.0 version.
- Select iDocs 2.0 Form to save to iDocs’s 2.0 version.
- This is useful if you have users with a 16-bit Filler. You save your form in 2.0 so that users of the 16-bit Filler can access the form. However, some features available in iDocs 5.0 may not be displayed or printed in the 2.0 version.
- Select OFML 2.0 to save to inFORM Decisions’s iDocs Markup Language (OFML), version 2.0.
- Select OFML 1.0 to save to inFORM Decisions’s iDocs Markup Language (OFML), version 1.0. OFML 1.0 is compatible to iDocs Internet Publisher, version 2.02.
- Select HTML to save the form to Hyper Text Markup Language (HTML).
- You can see how a form looks in HTML before you convert it to HTML. Open a form and choose Preview in Browser… in the File menu. The Preview in Browser dialog box appears. Select a browser and click Preview. Your form appears in the selected browser.
- Select PDF to save to a Portable Document Format.
- Select Microsoft Word (RTF) to save the form in the Microsoft Word rich text format.
- Type the name of your file in the File name text box if necessary.
- Click Add to PageKeeper if you would like to link the saved form in PageKeeper’s default folder. This setting only appears if you have PageKeeper installed on your system.
- Depending on the Save as type option you have selected, do one of the following:
- If you have selected iDocs Form, iDocs 3.0 Form, iDocs 2.0 Form, OFML 2.0, or OFML 1.0, click Save and iDocs saves the form to your chosen format.
- If you have selected Microsoft Word (RTF), click Options… and proceed to page 45
- If you have selected HTML, click Options… and proceed to page 46.
- If you have selected PDF, click Options… and proceed to page 47.
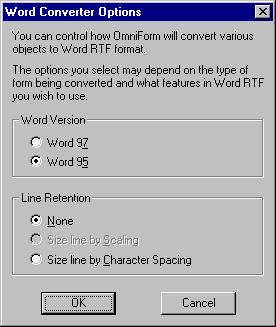
To set your options for Word conversion:
- Select an option under Word Version.
- Select an option under Line Retention.
- Select None if you do not want the converter to change the text to fit the lines.
- Select Size line by Scaling (Word 97 only) to change the width of the characters to fit the lines.
- Select Size line by Character Spacing in order to change the amount of space between the characters to fit the lines.
- Click OK to close the dialog box.
- Click Save to save your form to your chosen format.
iDocs converts your form to the Microsoft Word format. Open the converted form in Microsoft Word and select Page Layout in the View menu. You can now modify the form’s design. To fill in the form’s fields, you must protect your form. To do so, first select Protect Document in the Tools menu, and then select Forms in the Protect Document For text box. If you decide to modify the protected form’s design, you must select Unprotect Document in the Tools menu before you can modify the form. Please refer to your Microsoft Word documentation for more information.
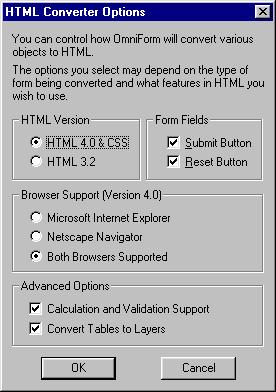
To set your options for HTML conversion:
- Select an option under HTML Version.
- Select HTML Version 4.0 & CSS to support HTML version 4.0 and cascading style sheets, which provide the exact placement of objects on a form.
- Select HTML Version 3.2 to support HTML versions earlier than 4.0.
- In the option under Form Fields, select whether you want to add a submit button, a reset button, or both.
- Select Submit Button to add a submit button to the bottom of your form. This will allow you to submit your form to a Web address after your form has been converted. To do so, first type the Web address in the Submission tab of the Properties dialog box. See “ Setting Submission Information” on page 136 for more information.
- Select Reset Button to add a reset button to the bottom of your form. This will allow you to clear the information from the form’s fields after your form has been converted to HTML.
- If you have selected HTML Version 4.0 & CSS, select an option under Browser Support (Version 4.0). You can select Microsoft Internet Explorer or Netscape Navigator.
You can also choose to have both browsers supported. If you select Both Browsers Supported the file will contain HTML for both browsers and will double the file size, increase download times and decrease performance. - Select Calculation and Validation Support if you want calculations, validation, and field formatting options to be converted.
- Select Convert Tables to Layers if you have tables and other objects on your form and you want to maintain the position of the objects.
- Click OK to close the dialog box.
- Click Save to save your form to your chosen format.
iDocs converts your form to HTML with your selected options.
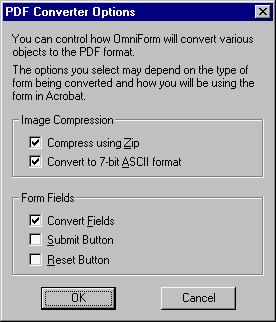
To set your options for PDF conversion:
- Select an option under the Image Compression box.
- Select Compress using Zip if your file is large and you want to compress it. If you have selected the compression option, you can also select the Convert to 7-bit ASCII format. This option converts your compressed file back to an ASCII format.
- In the option under Form Fields, select whether you want your form’s fields converted and if you want to add a submit button, a reset button, or both.
- Select Convert Fields so that you will be able to fill all the fields on the form after your form has been converted to a PDF. The form retains the field’s definition. For example, if the form’s field has been defined as a text field, you will be able to fill that field with text. Likewise, if the form’s field has been defined as a check box, you will be able to fill that box with a check mark.
- Select Submit Button to add a submit button to the bottom of your form. This will allow you to submit your form to a Web address after your form has been converted. To do so, first type the Web address in the Submission tab of the Properties dialog box. See “ Setting Submission Information” on page 136 for more information.
- Select Reset Button to add a reset button to the bottom of your form. This will allow you to clear the information from the form’s fields after your form has been converted to a PDF.
- Click OK to close the dialog box.
- Click Save to save your form to your chosen format.
iDocs converts your form to a PDF with your selected options.
To save as a Mailable Filler:
The mailable filler option is a limited function filler that allows other users, who do not have iDocs installed, to receive and fill out iDocs forms. This option
is also a limited license usage, that is, you can use it for up to 100 licenses (and each license can be used once for a specific form).
- Choose Save As Mailable Filler… in the File menu. The Save As dialog box appears.
- Select iDocs Mailable Filler in the Save as type text box.
- Type the name of your file in the File name text box if necessary.
- Click Save. iDocs saves the form as a mailable filler. You can then send it electronically to a user to fill out and have the user return it to you in the same manner.
Publishing a Form to the Web
iDocs can easily publish your forms on intranets and to the Internet.
To publish forms to the Web you will need Microsoft’s Web Publishing Wizard installed on your system. If your system does not have Microsoft Web Publishing Wizard installed, you can obtain this Wizard by 1) installing the full application of Internet Explorer 4.0 and above, 2) downloading the Web Publishing Wizard from Microsoft’s Web site, or 3) installing the Web Publishing Wizard from the Windows 98 installation CD if you are running Windows 98.
To publish a form to the Web:
- Do one of the following:
- Scan a paper form
See “Scanning a Paper Form”. - Import an existing PCX or TIFF form file.
See “Importing an Image File”. - Open an existing iDocs (OFM) or iDocs Markup Language (OFML) form. See “ Opening a Form”.
- Create your own design.
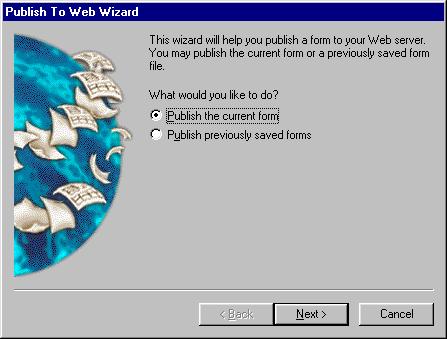
See “Designing a Form.” - After you have your form ready to publish, choose Publish To Web… in the File menu. The following dialog box appears.
- Select whether you want to publish the current form or previously saved forms.
- Select Publish the current form to publish the form you have open.
- Select Publish previously saved forms to publish saved forms.
- Click Next>.
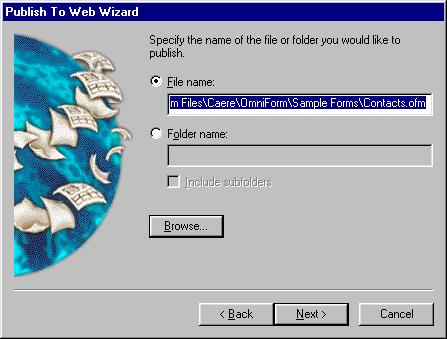
- If you have selected Publish the current form, proceed to step .
- If you have selected Publish previously saved forms, enter the file name or folder name in the dialog box that appears and proceed to step 8.
- If you have entered a folder name, all files in that folder will be published to the Web. If you have also selected Include subfolders, all subfolders in that folder will be published to the Web.
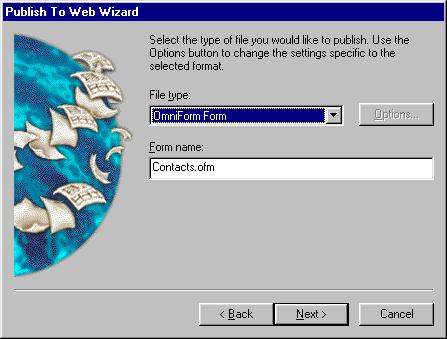
- Select the type of file you would like to publish in the dialog box that appears.
You can select iDocs Form, iDocs 3.0, iDocs 2.0, OFML 2.0, OFML 1.0, HTML, PDF or Microsoft Word (RTF).
- If you have chosen HTML, PDF, or Microsoft Word (RTF), click Options… to set specific formatting options.
- If you have selected iDocs Form, iDocs 3.0, iDocs 2.0, or Microsoft Word (RTF), proceed to step .
- If you have selected OFML 2.0, OFML 1.0, HTML or PDF, click Next>, and proceed to step .
- Enter an action (that is, where your data will be sent after it is submitted) in the Action text box.
It will be saved in the drop-down list for selection the next time you open this dialog box.
- The action could point to a Common Gateway Interface (CGI) script on a Web server; for example:
http://www.informdecisions.com/location-bin/script.pl
This would tell iDocs to submit data to a script on inFORM Decisions’s Web server. - The action could also be an e-mail address; for example:
mailto:name.othername@company.com
The form data would be submitted to that e-mail address. - Select a means of submitting data in the Method drop-down list.
- Select GET to append text to the Universal Resource Locator (URL) specified in the Action drop-down list.
- Select POST to notify the Web server to open the CGI application and pass the data to it.
- Click Next>. Microsoft’s Web Publishing Wizard appears. Follow all the dialog boxes in this wizard to publish your form to the Web.
The Web Toolbar
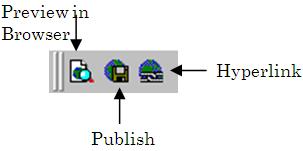
Use the web toolbar to preview your form in a browser, to access the Publish Wizard, and to access the Hyperlink options. To view the web toolbar, select Toolbars in the View menu and then select Web in the drop-down menu.
If you would like to keep this toolbar on your desktop, see “ Customizing Toolbars” on for more information. See the online help for more information about each button in this toolbar.
iDocs Internet Filler
After you publish a form to an intranet or the Internet, you can have users fill in your form by using iDocs Internet Filler. The Internet Filler is an easy-to- use version of iDocs that has a fill view but no design view. Therefore, Filler users cannot edit the form’s design in any way.
iDocs Internet Filler can operate within a Web browser or on its own. When it runs within a browser, you can hyperlink to an OFML form and fill it out online. When it runs on its own, you can work with OFML forms off-line.
Installing iDocs Internet Filler
iDocs Internet Filler is included on your CD-ROM.
Close all applications — including screen savers, virus checkers, and mail applications — before installing iDocs.
To install iDocs Internet Filler:
- Start Windows.
- Insert iDocs’s CD-ROM in the CD-ROM drive.
- Click Start in the Taskbar and choose ProgramsWindows Explorer (if you have Windows 95 or 98) or NT Explorer (if you have Windows NT).
- Locate InetFill on the CD-ROM.
- Select Oif32.exe (to install the 32-bit version) or Oif16.exe (to install the 16-bit version).
- Follow all the instructions in the dialog boxes that appear.
iDocs Internet Filler installs by default to the location. You can enter an alternate location if you choose.
See “Filling a Form,” for more information about filling a form.


