Table of Contents
Managing an iDocs (flashFORM) Database
This chapter introduces basic database concepts, including the following sections:
What is a Database?
Managing Database Records
Protecting Your Database
See “Designing a Form,” for detailed information on defining fields in a form so that all your records contain the proper information.
See “Using Calculations,” for detailed information on using calculations. Calculations automate data entry and reduce potential user errors.
What Is a Database?
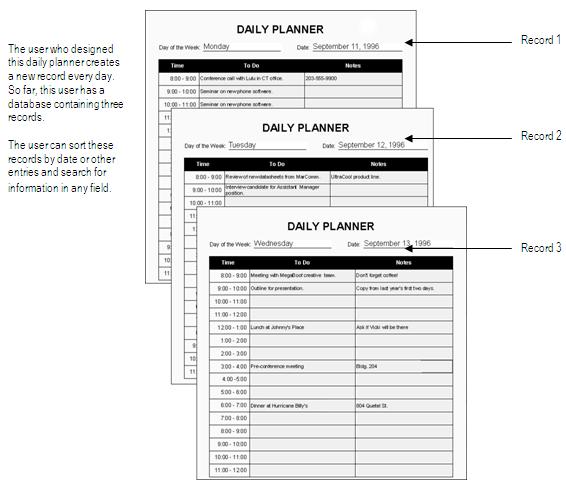
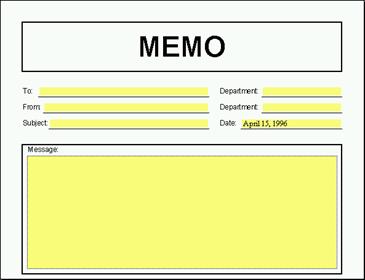
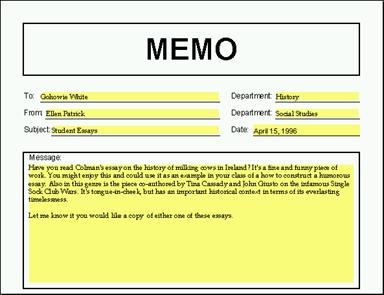
A database is a collection of information stored as individual records. Each record uses the same form design but can contain different information in its fields.
iDocs automatically creates a database when you scan in or import a form. As soon as you fill in the form, it becomes the first record in a new database. Any user of this database can create a new, blank form using the record as a template and then filling in new information to create another record. This makes it possible to store a large amount of similar information and retrieve it quickly and easily.
Managing Database Records
This section tells you how to create a database of records and manage its information. It contains the following topics:
- Creating New Records
- Duplicating Records
- Moving Through a Database
- Searching Records for Information
- Sorting Records
- Recalculating Records
- Deleting Records
- Refreshing Records
- Saving Records
- Exporting Information
- Using iDocs Data Files
- Importing Information
The form you open or scan in becomes the first record of a new database as soon as you fill in a field. You can then create new records with the same layout and fields and fill them with different information. See “iDocs Procedures,” if you do not know how to open or scan in a form.
For step-by-step instructions on creating a database and performing basic functions, see the online tutorials.
Creating New Records
As long as you have a form open and fill at least one field in the current record, you can create new records.
You cannot create a new record if data protection is turned on. See “ Protecting Your Database” for more information.
To create a new record:
- If the form opens in design view, click the Fill button in the design toolbar or choose Fill in the View menu to switch to fill view.
- Click in a field with the cursor or press Tab to place the cursor in the first fillable field.
- Enter information in the field.
iDocs cannot create a new record until you fill at least one field in an empty form. A form with fields filled only by automatic calculations (such as a date field) is still considered empty by iDocs. You must fill at least one field manually before you can create a new record.
- Press Tab to move to the next field.
Because a field is filled, you now have a database with one record in it. - Fill in as many fields as you like.
- Fill in this record with the appropriate information.
- Continue to create new records in this way as necessary.
Duplicating Records
You can duplicate any record in a database as long as it has information entered in at least one field. This is useful if you want to create records that will contain much of the same information.
A form with fields filled only by automatic calculations (such as a date field) is still considered empty by iDocs. You must fill at least one field manually before you can create a new record.
You cannot duplicate a record if data protection is turned on. See “ Protecting Your Database” for more information.
To duplicate a record:
- Open or scan in a form.
- Fill in the information that you want duplicated.
- Choose Duplicate Record in the Records menu.
iDocs duplicates and displays the new record.
To change an entry in a filled field, tab to a field or drag your cursor over the entry to highlight it and then type a new entry.
Moving Through a Database
Once you have multiple records, use the Record buttons in the fill toolbar or the commands in the Records menu to move through a database.
First Record
 Click the First Record button or choose Go To in the Records menu and First in its drop-down menu to move to the first record in your database.
Previous Record
 Click the Previous Record button or choose Go To in the Records menu and Previous in its drop-down menu to move to the record that is before the one you are viewing. If you are viewing record 3, for example, the previous record is record 2.
Record Number
 The Record Number text box displays the number of the current record.
To move to another record:
- Highlight the number in the Record Number text box.
- Type a new number.
- Press Enter to move to that record.
Next Record
 Click the Next Record button or choose Go To in the Records menu and Next in its drop-down menu to move to the record that is after the one you are viewing. If you are viewing record 3, for example, the next record is record 4.
Last Record
 Click the Last Record button or choose Go To in the Records menu and Last in its drop-down menu to move to the last record in your database.
New Record
 Click the New Record button or choose Go To in the Records menu and New in its drop-down menu to create and move to a new record.
Searching Records for Information
A database can contain a tremendous amount of information. If you had to search manually through hundreds of records in your database to find a particular record, it could take hours. A iDocs search, however, can retrieve records with the information that you need in seconds.
These retrieved records are called a found set. You can print, mail, or export the found set if you wish.
To search for information:
- Choose Search… in the Records menu.
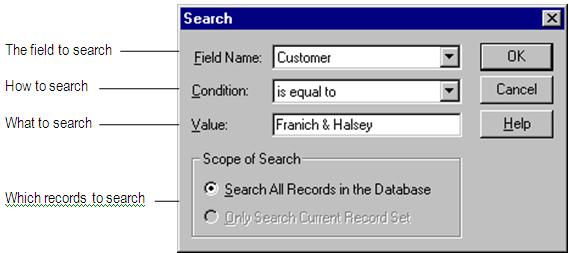
The Search dialog box appears.
- Select a field name in the Field Name drop-down list.
This is the field that contains the information you want to find. All the fields in your form are listed here.
To simplify searches, give each field a more descriptive name. Otherwise, you will have fields named FillText1, FillText2, and so forth, making it difficult to determine which fields contain what information. “Defining Objects on a Form” for detailed information.
- Select a condition in the Condition drop-down list.
A condition describes how to look for information entered in the Value text box. For example, suppose you entered the words Franich & Halsey in the Value text box.
The following bulleted items show the results of a search using each available condition option. - is equal to: find an exact match of the Value entry.
This finds records that have Franich & Halsey and nothing else in the Customer field. Make sure you have no extra spaces after your entry. If, for example, you typed in an extra space, then iDocs would search for the Franich & Halsey entry plus a space.
- is not equal to: find anything but the Value entry.
This finds records that have anything but Franich & Halsey in the Customer field.
- is greater than: find records of greater value than the Value entry.
This finds records that have entries in the Customer field later in the alphabet than the entry, for example, Franklin or Gallatron, Inc.
- is greater than or equal to: find records of equal or greater value than the Value entry.
This search finds records that have entries in the Customer field be¬ginning with the entry name itself up to the letter Z.
- is less than: find records of lesser value than the Value entry.
This finds records that have entries in the Customer field beginning with a symbol, a number, or letters earlier in the alphabet than the entry, for example, France or Dharma Dogs.
- is less than or equal to: find records of equal or lesser value than the Value entry.
This finds records that have entries in the Customer field beginning with a symbol, a number, or the letter A up to the entry name itself.
- begins with: find records that begin with the Value entry.
This search finds records that have Franich & Halsey as the entry or at the beginning of an entry in the Customer field.
- does not begin with: find records that do not begin with the Value entry or that do not contain the value entry at all.
This search finds records that do not have Franich & Halsey as the beginning of the entry in the Customer field or records that do not contain Franich & Halsey at all.
- ends with: find records that have the Value entry at the end of the selected field.
This search finds records that have Franich & Halsey as the entry or at the end of an entry in the Customer field.
- does not end with: find records that do not have the Value entry at the end of the selected field or records that do not contain the value entry at all.
This search finds records that do not have Franich & Halsey at the end of an entry in the Customer field.
- contains: find records that contain the Value entry.
This search finds records that have Franich & Halsey entered any¬where in the Customer field.
Be careful when selecting contains as one of your conditions. In a search for the value male, for example, your search would include any records that contained the word male. It would, therefore, also include records for female.
- does not contain: find records that do not contain the Value entry.
This search finds records that do not have Franich & Halsey entered anywhere in the Customer field.
- is empty: find records that have no entry in the selected field.
The Value text box is disabled if this is selected.
- is not empty: find records that have an entry of any sort in the se-lected field.
The Value text box is disabled if this is selected.
- Type the text to find in the Value text box.
Information is not case-sensitive. Typing Los Gatos is the same as typing los gatos.
How iDocs searches for the information in the Value text box depends on the selection in the Condition drop-down list as described in the previous step. - Select an option under Scope of Search.
- Select Search All Records in the Database to search the entire record set.
- Select Only Search Current Record Set to search a subset of records. This option is only available when you have a found set open from a previous search.
- Click OK.
iDocs searches for and retrieves all records that contain the information you specified in the Search dialog box.
Under the fill toolbar, iDocs displays the search information and number of records in the found set. If you need to narrow the search further, choose Search… again.
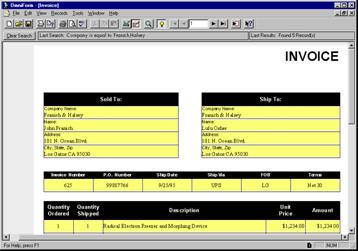
You might, for example, want to search the Franich & Halsey record set for invoices from a specific month. You can search each new subset of records as many times as you need to find the specific information you want. iDocs maintains the current found set if it retrieves no records during a search.
- Click Clear Search under the fill toolbar to return to the full record set when you are done.
Sorting Records
You can sort records in iDocs in ascending, descending, or original order entry. This is useful for many situations. If you wanted to export mailing information, for example, you could sort records by postal code to reduce bulk mailing costs. Or, you might want to sort invoices by date to find the most delinquent accounts.
You can print, mail, or export this information in the order in which it is sorted.
To sort records:
- Choose Sort… in the Records menu.
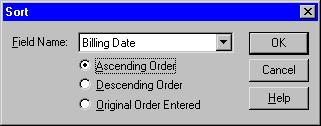
The Sort dialog box appears.
- Select the field by which to sort in the Field Name drop-down list.
All the fields in your form are listed here.
To make sorting as easy as possible, give each field a unique name after it is created. Otherwise, you could have fields named FillText1, FillText2, and so forth, making it difficult to figure out which fields contain what information. See “ Defining Objects on a Form” for detailed information.
- Select a sort order.
- Select Ascending Order to sort records from least to greatest; for ex¬ample, from A–Z or from 0–100. Symbols precede numbers which precede letters: $40, 40, Forty.
- Select Descending Order to sort records from greatest to least; for example, from Z–A or from 100–0. Letters precede numbers which precede symbols: Forty, 40, $40.
- Select Original Order Entered to sort records in the order in which you originally entered information in the selected field.
This is useful to view the history of information entered. - Click OK.
iDocs sorts the records in the order indicated.
Recalculating Records
Recalculating records applies any new or changed calculations to selected records in a database. Until you use the Recalculate… command, new or changed calculations apply only to new records.
See “Using Calculations,” for detailed information on creating calculations.
This command reapplies all existing calculations to the selected records. You may not always want this to happen.
For example, suppose you changed the mileage calculation in an expense form to reflect the latest rate. All new records would use the new calculation and reflect this rate. You do not want older records to use the new calculation because the original rate was correct at the time.
If you recalculated all records after adding the new calculation to the expense form, the mileage rates on your old records would also change. They would then be incorrect. To prevent this, you could search the records for those records newer than the date that you changed the mileage calculation, and apply the new calculation only to the newer records.
See “ Searching Your Database” for information on searching.
You cannot recalculate records if data protection is turned on. See “ Protecting Your Database” for information.
To recalculate records:
- Choose Recalculate… in the Records menu.
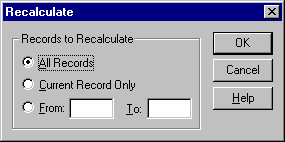
The Recalculate dialog box appears.
- Select the records to recalculate.
- Select All Records to apply the new or changed calculation to either the current found set or to every record in the database if the entire record set is open.
- Select Current Record Only to apply the new or changed calculation to just the record you are viewing.
- Select From/To to apply the new or changed calculation to a range of records.
Enter a number in the From and To text boxes. If you entered 1 in the From text box and 5 in the To text box, for example, iDocs would recalculate the first five records in your database or found set.
- Click OK. iDocs recalculates the records according to your specifications.
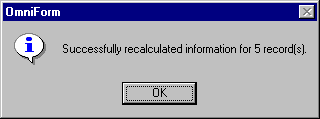
- Click OK in the dialog box that informs you how many records were recalculated successfully.
Deleting Records
This section describes how to delete one or more records in a database. Use this command to get rid of old, unwanted, or duplicate records.
You can export information from a record first if you want to delete a record but save its data. See “ Exporting Information” for instructions.
You cannot delete a record if data protection is turned on. See “ Protecting Your Database” for information.
To delete the current record:
- Choose Delete Record in the Records menu.A warning dialog box appears.
- Click Yes to delete the current record permanently.
To delete all records:
- Choose Delete All Records in the Records menu.
A warning dialog box appears. - Click Yes to delete all the records permanently.
To delete a found set of records:
- To delete a found set of records instead of all records, click Search… in the Records menu to find the records to delete.
See “ Searching Records for Information” for more information. - Choose Delete All Records in the Records menu.
A warning dialog box appears. - Click Yes to delete the found set of records permanently.
Refreshing Records
You refresh records to see if records have been updated. You can refresh records in a form that is currently open. This option is available only in fill view and when the form has sharing properties.
For more information about how to create a form with sharing properties, see “ Setting Attributes for a Form”.
To refresh a record or records:
- Choose Refresh Record or Refresh All Records in the Records menu.
If you have chosen Refresh all Records, iDocs automatically checks to see if any record has been updated and displays the freshest records. If you have chosen Refresh Record, iDocs automatically checks to see if the record has been updated and displays the freshest record.
Saving Records
You can save your current record anytime during the filling-out process. This option is useful when you are filling out long forms. You do not need to finish filling out a form before you can save a record of it. Records are automatically saved when you move from record to record.
To save a record:
- Choose Save Record in the Records menu.
iDocs saves your record to the database.
Exporting Information
This section explains the benefits of exporting information, how to prepare for export, and how to export information from an open iDocs form.
See “ Importing Information” for information on how to import information into a database.
The Benefits of Exporting Information
Export information from records to:
- Share information with other iDocs databases.
Information exported as a database file takes up considerably less disk space than the database itself. It can be copied or mailed more quickly than the entire database. - Share information from different databases.
For example, you might have a FoxPro database and decide that you need information already entered in a iDocs database. Simply export the needed information from iDocs in the appropriate format and use FoxPro’s commands to import it. - Save other database users the time of entering data manually by sending them a iDocs Data or other database file.
Preparing for Export
During import, you will link field names in the exported data file to field names in the import database. This tells iDocs where to place the field information. If possible, try to:
- Match field names in the exported data to field names in the import data¬base.
- Match field order in the exported data to field order in the import data¬base.
This makes it easier to figure out which information will go in which fields when you link the fields on import.
For example, suppose you export information in the fields Customer, Title, and Product, in that order. You have the same field information in the import database, but the fields are named What Bought, Name, and Position, in that order. You could link CustomerName/TitlePosition/ProductWhat Bought easily but importing hundreds of fields with different names and field order would be difficult and time-consuming.
See “Designing a Form,” for information on naming and reordering fields.
To export information:
- Choose Export… in the File menu.
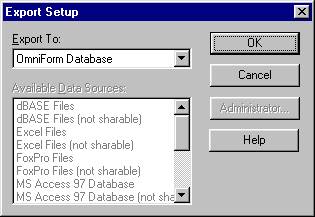
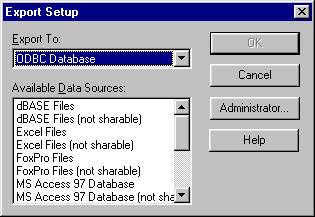
The Export Setup dialog box appears.
- Select a database file type in the Export To drop-down list.
- Select iDocs Database to export information to a iDocs Data file.
- Select ODBC Database to select a data source in the Available Data Sources list box.
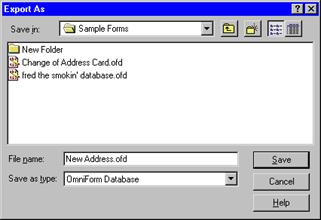
See “ ODBC Database” for more information on this di¬alog box. - Click OK. The Export As dialog box appears.
- A file name appears in the File name text box.
The file is named by default with the name of the currently open da¬tabase. You can change the file name if you want. - The database file type you selected in the previous dialog box ap¬pears in the Save as type drop-down list.
- Use the Save in drop-down list to select a location for the file.
- Click Save.
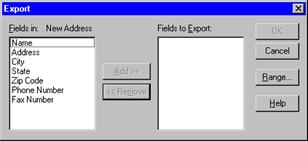
The Export dialog box appears.
All the fields in your currently open database appear in the Fields in list box.
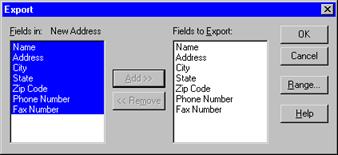
- Select each field that contains the information to export and click Add» to move it to the Fields to Export list box.
- Shift-click to select or deselect multiple adjacent records, or hold down the mouse button and drag the cursor over adjacent records.
- Ctrl-click to select or deselect multiple nonadjacent records.
- Select a field on the right and click «Remove if you decide not to export its information.
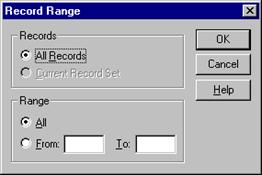
- If you want to specify a range of records to import, click Range… to open the Record Range dialog box.
Otherwise, iDocs exports all records by default.
- Select All Records to export all records in the current database.
- Select Current Record Set to export the current found set of records. This option is available after a search.
Type the first record number to export in the From text box and the last record number to export in the To text box. - Click OK to return to the Export dialog box.
- Click OK.
iDocs exports the information in the selected fields to the specified file. - Click OK in the dialog box that tells you how many records were suc¬cessfully exported.
ODBC Options
Installed ODBC database drivers appear in the Available Data Sources list box when you select ODBC Database in the Export To drop-down list. Depending on your database driver, you can export up to 255 fields at a time.
To export your data to an available data source:
- Choose Export in the File menu.
The Export Setup dialog box appears. - Select ODBC Database in the Export To drop-down list.
- Select a source from the Available Data Sources list box and click OK.
An Export As dialog box appears. - Enter a file name in the File name text box if it does not appear auto-matically.
The database file type that you selected in the previous dialog box appears in the Save as type drop-down list. - Follow steps 6 through 10 in the previous section “To export informa¬tion.”
Using iDocs Data Files
This section explains how to use iDocs Data files to open shared forms and how to set up a shared form location. A shared form is one other users can access.
When you export iDocs data from a form, the form’s file name is stored inside the Data file. iDocs uses the file name information as well as pathway information in the Options dialog box to locate and open a copy of the original form. The form automatically imports information from the Data file. This is useful for sharing data, especially if you want to send another user just part of a database.
To set up the shared form location:
- Select or create a folder for your shared iDocs forms.
You can make the form read-only so users can only open a copy of the form, not the original. - In iDocs, choose Options… in the Tools menu.
The Options dialog box appears. - Click the File Locations tab.
- Select Shared Forms in the File Types drop-down list.
- Type the path to your shared form(s) in the Location text box.
- Click OK.
All iDocs users must type the same pathway in the Options dialog box to use shared forms in that location.
To export the data:
- Use the Export… command in the File menu to create a iDocs Data file. See “ Exporting Information” for information.
- Use the Send… command in the File menu in fill view to mail data (as an attached iDocs Data file) to another user. See “ Mailing a Form” for more information.
To use a iDocs Data file to open a shared form:
- Locate the iDocs Data file to use.
- Double-click the file or select it and choose Open in its folder’s File menu.
A copy of the shared iDocs Form from which the iDocs Data file was exported opens. iDocs automatically imports the information in the iDocs Data file into the form.
Importing Information
This section explains how to import field data (information) into a iDocs database from another database source. You can import data from four sources:
- Another iDocs Form
The selected form must be closed. - A iDocs Data file
This contains information exported from a iDocs database. - Any supported database source, such as FoxPro
- Available sources depend on the installed database drivers.
- A iDocs Mailable Filler
Data consists of information entered in fields, such as text, check marks, and calculations. Importing data saves you the time of entering the same data manually and allows you to share data with other database users.
You must first export data from another database in order to import it into iDocs. See “ Exporting Information” for information. See your database documentation if you are exporting from another database program.
You cannot import information if data protection is turned on. See “ Protecting Your Database” for information.
To import field information:
- Open or scan in a form.
- Choose Import… in the File menu.
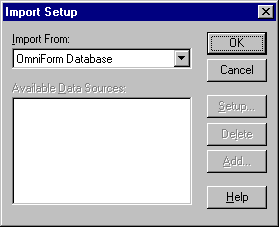
The Import Setup dialog box appears.
- Select the type of database information to import in the Import From drop-down list.
- Select iDocs Database to import information from a iDocs Form or from a iDocs Data file.
- Select a data source in the Available Data Sources list box to import files from another database source.
You can also add, delete, and set up data sources. - Click OK.
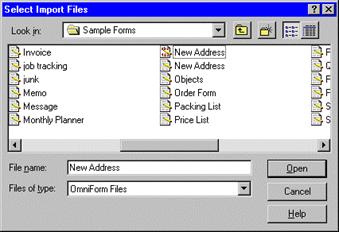
The type of dialog box that appears next depends on the type of database file you have selected. The Select Import Files dialog box appears if you have selected iDocs Database.
A iDocs Data (OFD) file has a different icon than a Form (OFM) file. The first New Address file in the picture above is a data file.
- Locate and select a Data file to import.
- Click OK.
Depending on the database source you have chosen, more dialog boxes may appear. Select the appropriate options.
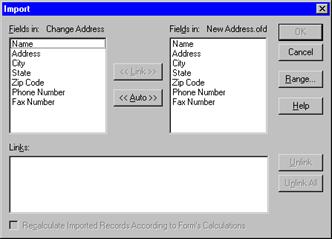
The Import dialog box appears after you select a file.
- Fields in the open iDocs database appear on the left.
- Fields you can import from the other database appear on the right.
- Link fields on the left to fields on the right.
This tells iDocs which field data to import from the other database and where to import it in the current database. - To link individual fields, select a field on the left, select its corre-sponding field on the right, and click Link.
- Click Auto to automatically link all fields with the same name.
Linked fields appear in the Links list box.
- Select a link in the Links list box and click Unlink to unlink it.
- Click Unlink All to unlink all fields.
- Select Recalculate Imported Records According to Form’s Calcula-tions when it is selectable to apply existing calculations to the im-ported records.
- Click Range… to open the Record Range dialog box to specify a range of records to import. Otherwise, iDocs imports all records by default.
- Type the first record number to import in the From text box and the last record number of the range to import in the To text box.
- Click OK to return to the Import dialog box.
- Click OK when you are done linking fields.
iDocs imports the information into the selected fields, creating as many new records as necessary in the process. - Click OK in the dialog box that tells you how many records were imported successfully.
Protecting Your Database
It is important to protect information and form design in your database. This section describes how to use the iDocs protection options to protect both your data and form design from potential deletions or changes, as well as the benefits of using the iDocs Filler program.
If your iDocs database has an administrator, check with the administrator first before making any changes.
Protecting Data
Many databases have multiple users. Until a user is familiar with database concepts and how to use iDocs, you may want to protect the information (data) entered in fill view from deletion or change.
To protect your data:
- Choose Protection… in the Tools menu.
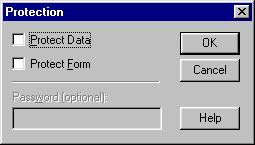
The Protection dialog box appears.
- Select Protect Data.
- If you wish, type a password in the Password text box. Passwords are case sensitive. You will be prompted to reenter your password for con¬firmation. The next time anyone tries to change the data, a dialog box appears, informing the user of the form’s protection status. The user will not be able to make any changes unless the user knows the pass¬word and can turn off the protection.
- Click OK.
Information in fill view is now read-only. All the commands and buttons associated with protected operations are grayed out. - Place your cursor in a fill text field and try to type text.
A dialog box appears.
- Click OK to close the dialog box.
Users can export data or copy text in protected mode but cannot alter form information in any other way such as by filling fields or importing data.
Repeat steps 1–4 in the preceding instructions but deselect Protect Data in the Protection dialog box to turn off data protection.
Protecting the Form
The form layout you create in design view is used by every record in a database. Any change made in design view affects all records in fill view. This is important to remember if the database has multiple users.
Deleting a fillable field in design view deletes all information entered in that field in fill view.
To protect your form:
- Choose Protection… in the Tools menu.
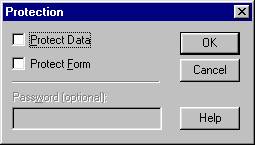
The Protection dialog box appears.
- Select Protect Form.
- If you wish, type a password in the Password text box. Passwords are case sensitive. You will be prompted to reenter your password for con¬firmation. The next time anyone tries to change the form’s design, a dialog box appears, informing the user of the protection status. The user will not be able to make any changes unless the user knows the password and can turn off the protection.
- Click OK.
The drawing toolbar and many buttons in the design toolbar are now grayed out. All the menu commands associated with these buttons are grayed out as well. - Click anywhere on the form.
A dialog box appears.
- Click OK to close the dialog box.
Users can change viewing preferences and use most basic file commands such as Print and Save but cannot format or redesign the form in any way.
Repeat steps 2–4 in the preceding instructions but deselect Protect Form in the Protection dialog box to turn off form protection.
iDocs Filler
iDocs Filler is an easy-to-use version of iDocs that contains a fill view but no design view. Therefore, iDocs Filler users can open and fill forms created in iDocs (without having iDocs installed on their systems), but cannot edit the form’s design in any way.
The data protection option, when set for a form in iDocs, is also enabled for that form in iDocs Filler. It cannot be turned off in iDocs Filler.
See “ Protecting Data” for detailed information on the data protection option.
iDocs Filler is included on your iDocs CD-ROM. However, before you can use iDocs Filler you must purchase an unlock code. To obtain an unlock code in the U.S. or to purchase additional versions of iDocs Filler, please call (800) 858-5544.
