Table of Contents
Filling a Form
This chapter describes how you or another user would fill out a form created in iDocs.
This chapter contains the following sections:
- The Fill View Window
- Moving Through Fields
- Filling Fields
- Spell Checking
- Saving in Fill View
You must first open, scan, or import a form in order to fill it.
The Fill View Window
This section provides an overview of the fill view window.
 If you are in design view, click the Fill button in the design toolbar or choose Fill in the View menu to switch to fill view.
The fill view window contains a toolbar and seven menus.
Use fill view to enter data in fields, create a records database, import and export information to and from records, and print or mail forms.
See “Managing a iDocs Database” for detailed information on database creation and management.
The Fill Toolbar
Use the fill toolbar for basic file operations such as saving and printing. Use it also to move through records in a database.
All these buttons correspond to menu commands of the same name. Clicking a button is the same as choosing its corresponding menu command.
All corresponding menu commands are explained in online help or in various sections throughout this manual (see the index for exact locations). Processes such as scanning or opening a form are explained in the Chapter on “iDocs Procedures.”
You can also drag the fill toolbar to any other location in the iDocs window.
Moving Through Fields
You can click in any field to place the cursor there or you can use the following keyboard commands to move the cursor within a form.
Filling Fields
This section describes each type of fillable field in iDocs, how to fill it, and how to check spelling. It contains the following topics:
- Type Ahead
- Shrink Text to Fit Fields
- Fill Text
- Comb
- Check Box
- Circle Text
- Table
- Fill Graphic
- List Fields
- Fields Defined by a Calculation
- Field Validation
These instructions assume that the cursor is already in a field.
The way information is displayed in a field depends on the current form language selection and the object definition. See “International Settings” and “Defining Objects on a Form” for more information.
Type Ahead
As you begin to enter a word in a fill text object, iDocs will automatically complete the word. This option works only when there is previously filled information that matches the word you are entering. It also works for dates, times, and pop-up lists.
To type ahead:
- Choose Options… in the Tools menu. The Options dialog box appears.
- Click the Filling tab.
Select Enable Type Ahead if you want this option.
Deselect Enable Type Ahead if you do not want this option. - Click OK.
Shrink Text to Fit Fields
When filling a form, the text you enter may not always fit in the fill text fields. You can make your text automatically fit your fields.
To shrink text to fit fields:
- Choose Options… in the Tools menu.
The Options dialog box appears. - Click the Filling tab.
Select Automatically shrink text to fit within fields if you want this option.
Deselect Automatically shrink text to fit within fields if you do not want this option. - Click OK.
Fill Text
Enter characters in a fill text field: letters, numbers, symbols, dates, and so forth. Fill text fields can contain any sort of textual information. The example below shows First Name and Last Name fill text fields.
Comb
Enter characters in a comb field: letters, numbers, or symbols appropriate to the field. Phone numbers and zip codes are commonly used comb fields. A comb field consists of individual comb elements. Each element can contain a different number of characters.
You do not have to tab from element to element in a comb field. Just type the required amount of information and iDocs automatically moves the cursor to the next element as appropriate.
Check Box
Click a check box field to fill it. A check box field can contain one of three elements: a check mark, an X, or a fill. The default value of a check box is an X; but you can easily change it to a check mark or a fill.
Check boxes are commonly used for Yes/No questions and for selecting an item in a group, as in the two examples below:
Check boxes may be grouped; this means that only one can be selected. Selecting one check box automatically deselects another checked box in the group as in the example below.
To move through grouped check boxes, use the arrow key on your keyboard.
Circle Text
Click a circle text field to fill it. A border appears around the filled field. A circle text field can contain text and other characters, or it can function much like a check box (see the previous section “Check Box”).
Table
A table field consists of individual cells. Table cells are fill text fields by default. Enter characters in these cells just as you would in fill text fields.
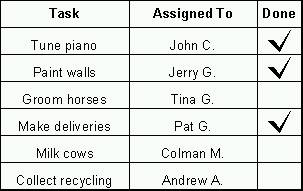
A table cell can also contain any other type of field, even multiple fields of the same or different types. In the example below, the table cells on the right contain check box fields.
The user clicks this cell to fill it in the same way as a check box field. See “Designing a Form,” for information on tables, converting fields from one type to another, inserting objects in table cells, and so on.
Fill Graphic
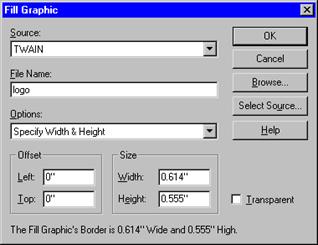
A fill graphic field contains a graphic you select. You can import an existing graphic or you can select a TWAIN-compatible scanner source and scan an image directly into the fill graphic field. This section describes both options.
To import an existing graphic:
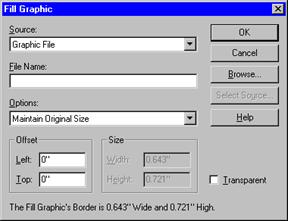
- Click the fill graphic field or tab to the field and press the Space bar.
The Fill Graphic dialog box appears. - Select Graphic File in the Source drop-down list.
- Enter a file name in the File Name text box.
Or, click Browse… to locate a file. Select a file, and click OK to return to the Fill Graphic dialog box.
The file name appears in the File Name text box. - Select an option in the Options drop-down list.
Select Maintain Original Size to import the graphic without changes.
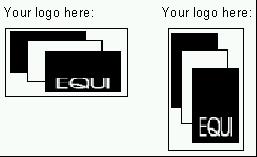
- Select Scale Proportionally to fit the graphic in the fill graphic field while maintaining its exact proportions.
- If you had a 2-inch by 2-inch graphic, for example, and the fill graphic field was 3 inches by 3 inches, the graphic would be enlarged to approximately a 3-inch by 3-inch size. It would fit in the field and maintain its 1:1 size ratio.
- Select Stretch to Fit to change your graphic’s original shape and size to fit in the fill graphic field If you had a 2-inch by 2-inch graphic, for example, and the fill graphic field was 3 inches by 3 inches, the graphic would be enlarged to approximately a 3-inch by 3-inch size. It would fit in the field and maintain its 1:1 size ratio.
Depending on the shape of the fill graphic field, your graphic may be stretched or compressed. You might want to use this for special effects.
- If you had a 2-inch by 2-inch graphic, for example, and the fill graphic field was 3 inches by 3 inches, the graphic would be enlarged to approximately a 3-inch by 3-inch size. It would fit in the field and maintain its 1:1 size ratio.
- Select Specify Width & Height to specify the graphic’s size.
Enter measurements for your graphic in the Width and Height text boxes under Size. The size of the fill graphic field is displayed at the bottom of the Fill Graphic dialog box
If you enter a size larger than the fill graphic field, only part of the graphic will be visible. - Enter offset measurements under Offset.
This is useful if you want to position a graphic exactly in the field, crop a large graphic, or move the graphic away from a field border that would interfere with its design. - Enter a number in Left to specify how far away from the left side of the field to place the graphic.
- Enter a number in Top to specify how far away from the top of the field to place the graphic.
- Select or deselect Transparent.
- Select Transparent if you want to be able to see information behind the graphic.
Whether a graphic prints transparently depends on your printer driver. See your printer documentation for information. - Deselect Transparent if you want the graphic to be opaque.
You will not be able to see information behind the graphic. - Click OK.
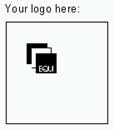
iDocs imports the graphic and displays it in the fill graphic field.
To import a graphic from a TWAIN source:
- Click the fill graphic field or tab to the field and press the Space bar.
The Fill Graphic dialog box appears. - Select TWAIN in the Source drop-down list.
- Click Select Source to open the Select Source dialog box.
- Select your TWAIN source and click OK to return to the Fill Graphic dialog box.
- Type a file name in the File Name text box.
This is the file name the graphic will have after it is scanned and saved automatically by iDocs.
- Click Browse… if you need to locate a path for the file.
- Set a path in the Browse dialog box, type a name for the file, and click OK to return to the Fill Graphic dialog box.
- Follow steps 4 through 6 in “ To import an existing graphic” on page 164 and then return to step 7 on this page.
- Place the page with the graphic that you want in your scanner, making sure it is aligned correctly.
- Click OK.
iDocs scans the graphic and displays it in the fill graphic field.
To delete a graphic from a fill graphic field:
Select None in the Fill Graphic dialog box to delete a graphic from the form and leave the fill graphic field empty.
List Fields
Fields can contain a list of selectable entries. A drop-down list arrow appears when the cursor is in the field.
Click the arrow to open the list
Select an entry. The entry appears in the field.
Fields Defined by a Calculation
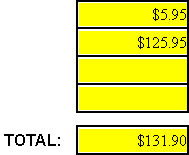
The only time you would notice a calculation in fill view is when a field fills in automatically.
In the example below, the TOTAL field automatically added the amounts entered in the first and second fields. The TOTAL would increase if the third and fourth fields were filled as well.
You define a calculation on a field in design view. See “Using Calculations,” for detailed information on calculations.
Field Validation
Fill text fields can be configured by the creator to:
- Require that you enter information in a field and do not leave it blank.
- Require that you enter specific information in a field.
- Require both of the above.
- Require that you choose from a list of choices.
This is field validation and ensures that information entered in a form is consistent.
For example, you may be required to enter a date in a validated Date field. You would receive a reminder prompt from iDocs if you attempted to enter anything other than a date.
- Click No to return to the field and enter the expected information.
- Click Yes to override field validation.
See “To set validation options for fill text objects:” for detailed information on field validation.
Spell Checking
Use the spell-checking feature to verify that text field entries are correct.
Before you check spelling make sure you have selected the correct language for your form in the Options dialog box as described below.
Proceed to “ Spell Checking Your Form” on page 170 if you have a single- language form, or the Current Form language selection is correct, or you have a dictionary for that language.
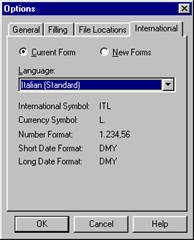
To Check the Current Form Language Selection:
- Choose Options… in the Tools menu.
The Options dialog box appears. - Click the International tab.
- Click Current Form.
The Language selection is grayed out but readable in fill view.
- If the language selection for Current Form is incorrect, click Cancel and proceed to “ To Select a Language for Your Form” on page 19.
- Click OK if the language is correct.
Spell Checking Multiple Languages
You may have scanned in a form with the Allow Multiple Languages option selected. (See “The Allow Multiple Languages Option”.) You have two choices for effective spell checking:
- Decide which language makes up the majority of your form and select that language as the Current Form selection.
This is faster but less accurate. - Spell check only the portion of the form that the Current Form selection matches. Change the Current Form selection to match another portion of the form, spell check that portion, and so on for each language in the form.
This is more time-consuming but more accurate. Remember that changing the Current Form selection could cause iDocs to reformat data already entered in fill view.
Dictionaries for Spell Checking
Dictionaries for all supported languages are included in the International English version of iDocs. The United States version has a standard English dictionary. You can call 1-800-654-1187 to order additional dictionaries. You must have a dictionary that matches the language of a form to spell check it.
Spell Checking Your Form
iDocs has two ways to spell check your form.
- iDocs automatically places a red wavy line under misspelled words and double entries. You simply right-click the error and select the correction from the menu that appears.
If you want to turn off this automatic spell checker, choose Options… in the Tools menu. In the dialog box that appears, select the Spelling tab.
Deselect Check spelling automatically to turn off the automatic spell checker. - You can also check the spelling of your form by using the Spelling dialog box.
To spell check your form:
- The suggested spelling, if there is one, appears in the Change To text box.
- Other suggested spellings appear in the Suggestions list box.
- Click one of the following options: Ignore, Ignore All, Change, Change All, Add, or Suggest.
- Click Close to end the spell check.
- Click OK in the dialog box that tells you the spell check is done.
Saving in Fill View
iDocs automatically saves in fill view. iDocs saves after numerous user actions, such as, moving from one record to another, printing or closing a form, before importing or exporting data, and in many other situations. You would rarely need to use the Save command in fill view except to:
- Save changes to the entire form, both changes made in design view and data entered in fill view.
- Save information entered in the Print offsets for data option in the Print dialog box.
Use the Save As… command in fill view to save a form to another location or with a different file name.


