This is an old revision of the document!
Table of Contents
[ Up To Index ]
iView 8 Setup
iView version 8 is significantly different than it's previous versions offering many enhancements.
Installation and Configuration
iView is comprised of two parts: The iView front end run on Tomcat Server, and the back end running on the IBMi. Apache Tomcat is used to deploy your Java Servlets and JSPs. So in your Java project you can build your WAR (short for Web ARchive) file, and just drop it in the deploy directory in Tomcat. So basically Apache is an HTTP Server, serving HTTP. Tomcat is a Servlet and JSP Server serving Java technologies.
Front end - Apache Tomcat
Download iView WAR file
The iView front end is typically provided in a war file. Download this file to your home directory in the IFS using binary file transfer, and then execute these commands ( populating the names with those used in your installation ). The directory /home/user is meant to refer to your user profile's home directoryl
call qp2term
cd /home/user
tar -xf iView8.00-FrontEnd-Php5.4.tar
cd /www/zendsvr6/htdocs/iview800
find . -type d -print | xargs chmod 755
find . -type f -print | xargs chmod 644
chmod 666 i5_def.php
chown -R qtmhhttp
You should now add the following stanza to the Apache configuration file used by the Zend Server. This file is /www/zendsvr6/conf/httpd.conf. You may append this to the file:
 <LocationMatch "/iview*">
 	        PasswdFile %%SYSTEM%%
 	        AuthType Basic
 	        AuthName "i5 User Profile"
 	        Satisfy All
 	        Require valid-user
 </LocationMatch>
These statements establish browser authentication against the IBM i profile. iView will not work without user authentication. You may establish user authentication through any means that Apache will allow.
At this point, if your machine's IP is 192.168.0.2 you should be able to point your browser at http://192.168.0.2/iview800 and get a response.
Download Tomcat distribution file
Download Tomcat 6.x from FTP site at:
ftp:// ftp.informdecisions.com/ftpRoot/CustomerFTP/iView/apache-tomcat-6.0.39.zip
and upload Tomcat distribution file to an IFS directory, for example /home/download.
Change your current working directory to /www then decompress Tomcat distribution file using qshell command:
ajar -x /home/download/apache-tomcat-6.0.39.zip
Add environment variable JAVA_HOME at system level
Set JAVA_HOME environment variable: go to directory /qibm/ProdData/Java400 and choose a JDK version that you want to set for JAVA_HOME, then type command:
ADDENVVAR ENVVAR(JAVA_HOME) VALUE(/qopensys/QIBM/ProdData/JavaVM/xyz) LEVEL(*SYS)With xyz is the JDK folder of the version you want to set.
ADDENVVAR ENVVAR(JAVA_OPTS) VALUE(' -Dos400.awt.native=true -Djava.awt.headless=true -server
-Xms1536m -Xmx3072m -XX:NewSize=256m -XX:MaxNewSize=1024m -XX:Perm Size=256m -XX:MaxPermSize=1024m') LEVEL(*SYS)
Verify the availability of the ports used by Tomcat
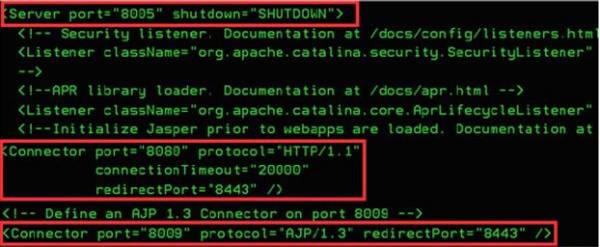
Tomcat uses 8005, 8080, and 8009 by default among which 8080 is the default HTTP port. Enter the command NETSTATOPTION(*CNN) to verify whether the ports are in use. If port 8009 and 8080 are occupied, edit the configuration file /www/apache-tomcat-6.0.39/conf/server.xml to change default ports 8005, 8009, and 8080 to other ports which are not in used. If you have multiple Tomcat servers running on this IBM i, you will need to use different ports for these values.

Change security for Tomcat folder
Type command:
CHGAUT OBJ('/www/apache-tomcat-6.0.39') USER(*PUBLIC) DTAAUT(*RWX) OBJAUT(*ALL) SUBTREE(*ALL)
Root userID and Password:
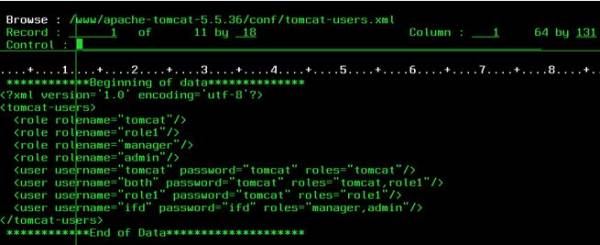
Go to /www/apache-tomcat-6.0.39/conf/tomcat-users.xml
And add:
<role rolename=“admin”/>
<user username=“<your_user_name>” password=“<your_password>” roles=“manager,admin”/>

Start Tomcat
Tomcat is installed and configured successfully. Now you can start Tomcat by using command: (Where the job queue is where you want to run Tomcat)
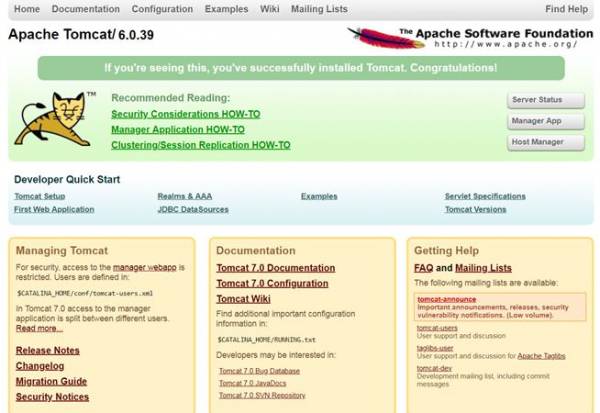
STRTOMCAT JOBQTo open your web browser, enter the URL http://your.server.name:8080

Stop Tomcat
Use command ENDTOMCAT to stop Tomcat
Back end - IBMi
The iView back end is typically provided in a savefile. To install, upload the savefile to the IBM i and restore it with a command like this ( you will need to populate this command with the names you are using on your system ):
RSTLIB SAVLIB(IVIEW800) DEV(*SAVF) SAVF(QGPL/IVIEW800) MBROPT(*ALL) ALWOBJDIF(*ALL)
Add the iView library to the top of the library list and execute GO IVIEW.
 IVIEW                    iView Version 8.44 02.20.18
                                                             System:   DEVV6CLT
   iView Archive Applications
      1. Work with iView Applications                        WRKIVWAPP
      2. Work with iView Processing Log                      CALL IVRELOG

   iView Server
     10. Work with iView Servers                             WRKIVWSRV

   Administrative Options
     20. Work with Administrative Menu                       GO IVIEWADM

                                                                         Bottom
 Selection


 F1=Help   F3=Exit   F12=Cancel
Enter License Keys and Set Location
Take option 20, then option 10 and when prompted enter the permanent or temporary license provided by your account manager. iView should have 3 key components: IVIEWWEB, IVIEW1, IVIEW2. Once entered, iView is now ready to use.
  8/30/18                      inFORM Decisions                       FM0070R1
 14:02:21                   iDocs Installation Library Set            KKRAMER

 System Information
    Serial Number:  102A36R       LPAR: 2     OS/400 Release: V6R1M0

 iDocs Production Information
    Product version . . . . . :
    iDocs Installation Library: IDOCS6     Name, F4 for list

 Location settings
    Country Code . . . . . . .: US
    Code Page. . . . . . . . .:    37  1-65535


 Press enter to continue
 F3=Exit   F4=Prompt   F12=Cancel
Press <Enter> and then F6 to add the 3 iView License keys:
  8/30/18                       inFORM Decisions                      IMREGPS2
 14:06:42                  Module Registration Screen                 KKRAMER


 Module Name. . .

 Registration Code

 Status . . . . .  No license found for


  F3=Exit   F10=Update   F12=Previous
Take option 20, then option 8 to set the iView location and path. Set the parameters as appropriate to your installation or upgrade and press <enter> to update. These values are stored in the data areas DSIVIEWLIB (for iView Library) and DSIVIEWDIR (for iView IFS Path).
                   Change iView Library & IFS Dir (CHGIVWLIB)

 Type choices, press Enter.

 iView Library  . . . . . . . . .   *SAME         Character value
 iView IFS path . . . . . . . . .   *SAME


                                                                         Bottom
 F3=Exit   F4=Prompt   F5=Refresh   F12=Cancel   F13=How to use this display
 F24=More keys
Migrating Any Meta Data Files
If this is an upgrade, you can migrate the meta data files, configuration and license keys with the command IVCOPYDATA.
                          iView Copy Data (IVCOPYDATA)

 Type choices, press Enter.

 Current iView Library  . . . . .   iviewold      Character value
 New iView Library  . . . . . . .   iview         Character value
 Action on Metadata Files . . . .   *copy         *MOVE, *COPY, *NONE


                                                                         Bottom
 F3=Exit   F4=Prompt   F5=Refresh   F12=Cancel   F13=How to use this display
 F24=More keys
The use of *MOVE rather than *COPY for the meta data files may be appropriate if the meta data files are large. Note that the archived documents themselves, in the IFS, are not normally moved. You can copy them to a new location if you wished with the shell command cp -R. See system documentation regarding the use of that command.
Archive Configuration
Menu IVIEW, option 1:
  8/30/18                          iView                              IV1000C1
 10:17:09                  iView Archive Application                  KKRAMER

 Type options, press Enter.
  1=Select   3=Copy   4=Delete   7=Rename   8=Clone Archive Structure
 15=Archive Spool File

 Position to              Name
                                           Target  iDocs       Last    Monitor
 Opt Application Description               Format  Application Field   Event
     ATPICKLIST  AllTrade Pick List        *PDF                INDEX04
     AWINVOICE   Adel Wiggins In-bound Inv *PDF                INDEX07
     AWTEST      Adel Wiggins Test         *PDF                INDEX03
     BOYDCHECK   Boyd Gaming A/P Checks    *PDF    BOYD805     INDEX05
     BOYDTABLE   Boyd Example Table        *PDF                INDEX04
     BOYDTOFLOW  Boyd Gaming A/P Checks    *TIFF   BOYD805     INDEX05
     BROCKAPIVW  BROCKAP Check             *PDF    BROCKAP     INDEX08
     CARBSTMT    Seprod Statement          *PDF    CARB STMT   INDEX03
     CJCINVOICE  Invoices incoming for A/P *PDF                INDEX09
     DCYJOBLOG   Test Archive JobLog       *PDF                INDEX06
     DCYTEST     DCY Testing               *PDF    *INDEX01    INDEX01
                                                                        More...
  F3=Exit   F5=Refresh   F6=Add
This display is used to add or change an archive definition.
Archive Options
Option 1 to select:
  8/30/18                          iView                              IV1000C3
 10:18:07                  iView Archive Application                  KKRAMER

  Application. . : ATPICKLIST   Description: AllTrade Pick List
  Library. . . . : IVIEW7       Directory. : /iview
  PDF Output Name: *NAME-*DATE-*TIME
  Disposition Opt. *ORIGINAL    Table Import N Y/N      Allow Null Value N Y/N
  Processing Opt.: *SYSTEM      iDocs App. :            Storage Format : *PDF
  Product. . . . :              Printing Queue (Signature) *LIBL

       Index   Field             From     To    So Bu- Sig        No. Pgs Ty
 Seq#  Field   Description      Row Col Row Col rt rst Tag Page#  Indexed pe Upd
 0010  INDEX01 Name               1   1   1  35  0  N   N  *FIRST          A  N
 0020  INDEX02 Warehouse Number   1   1   1  15  0  N   N  *FIRST          A  N
 0030  INDEX03 Date               1   1   1  10  0  N   N  *FIRST          A  N
 0040  INDEX04 FORMID             1   1   1  25  0  N   N  *FIRST          A  N
 0050                                            0  N      *FIRST          A  N
 0060                                            0  N      *FIRST          A  N
 0070                                            0  N      *FIRST          A  N
 0080                                            0  N      *FIRST          A  N
                                                                        More...
  F3=Exit   F8=Metadata Monitor   F10=Save   F11=Alt View   F12=Cancel
 F14=FTP Definition   F18=Signature Output Routing
- Application Name: Use 10 characters alphanumeric. Embedded blanks are not recommended.
- Description: Enter a recognizable description to identify this application.
- Library: This is the library in which the meta data file is stored and is a global setting stored in data area DSIVIEWLIB.
- Directory: This is the root of the iView IFS archives. It is a global setting stored in data area DSIVIEWDIR.
- PDF Output Name: Specify the file system object name of the archived document using constants and these keywords:
| *NAME | The archive name |
| *DATE | Processing date in format YYMMDD |
| *TIME | Processing time in format HHMMSS |
| *INDEX01 to *INDEX20 | Contents of meta data fields |
- Disposition Options: This controls the fate of the original spool file:
  *RETAIN        Retain in Output queue
  *ORIGINAL      Archive Original
  *SYSTEM        Archive Post Processing
  *NONE          Do Not Archive
- Table Import: Controls use of tables when importing from prior implementations of iScan. This field is not used with current software and should be set to N.
- Allow Null Value: Y/N
- Processing Options: Process spool file under the iView user profile or under the profile of the spool file owner. This will impact what profile owns the spool file post-processing.
  *SYSTEM        Use iView System Profile
  *SPLFOWNER     Use Splf Owner Profile
- iDocs Application: If you want the spool file processed through iDocs before archiving specify the application here. If specified what is archived is a laser document, else it is a pdf document made from the text spool file.
- Storage Format: Specify the document type of the file. *PDF is the usual selection due to ease of use with a browser. PDF is also the front end default and any other selection may require front end configuration changes. The use of *PDFSIG enables signature capture in the archive.
*PDF       *USERASCII PDF Conversion
*PDFSIG    PDF Convert for Signature
*TIFF      Tiff Image
- Product: Specify IDOCS to create a laser document using the iDocs Suite. Otherwise leave blank. This field is used for integrations with other document products.
- Printing Queue (Signature) Printing queue and queue library are specified to hold the output from the print option in signature capture. This is unconditional. Multiple and conditional print output from Signature Capture can also be configured using F18.
Meta Data Fields
The meta data fields are defined by their position in a *SCS spool file.
Seq#: You can change the order of the columns of the meta data table by keying a different sequence number
and pressing <enter>.
Sorting is specified as it is in iDocs:
    1          Primary Sort Ascending
    2          Primary Sort Descending
    3          Secondary Sort Ascending
    4          Secondary Sort Descending
    5          Third Sort Ascending
    6          Third Sort Descending
    7          Forth Sort Ascending
    8          Forth Sort Descending
    9          Fifth Sort Ascending
Since this is text against which users will search in a browser, the normal practice
is to define short, one line text fields as meta data. Fields such as customer name, customer number, etc.
You can define text blocks as meta data but the searching dynamics should be considered.
Meta data is stored in the meta data file, having the same name as the archive application, in the iView library.
Bursting works as it does in iDocs and as one would intuitively expect.
Sigtag: Specify a Y to display this field on the Signature Capture search dialog. You should define at least one field as sigtag for a Signature Capture application ( see Storage Format above ).
Page#: Use keywords *FIRST, *LAST, *ALL, or a specific page number to specify from which page the meta data
value is scraped.
No. Pgs Indexed: Key the number of pages from which spool text is scraped and concatenated to form the
meta data for the meta data field. Left blank, 1 page is scraped unless *ALL pages is specified.
Type: Specify blank or A for an alpha string. Specify D for a date field. If a date field, use F11 to enter a date format. The format specified should match the format in the spool file – i.e. tell iView how to parse the spool file date.
iView Servers (Engines)
iView servers are defined from menu IVIEW, option 10.
iView 8 engines are architected similarly to iDocs engines in that they are single threaded, and you can define and run an unlimited number of them in any subsystem.
  8/30/18                          iView                              IV2000C1
 10:38:24                      Engine Maintenance                     KKRAMER

 Type options, press Enter.
  1=Select   3=Copy   4=Delete   7=Rename   8=Start   9=End

 Position to              Name

 Opt Engine      Description                --- Archive Queue --- Status
     BOYDIVWENG  Boyd Check iView Engine    ARCHIVIEW  OFERRER
     BROCKAPSVR  BROCKAP iView Engine       BROCK      *SAME
     CARBSTMTEN  Seprod Engine              SEPROD     QASPLFL
     CDATEST     CDA Test                   ARCHIVE    IDOCS6
     DCYIVWSRV   DCY iView Server           OUTQARC    DCYQC
     DEMOENGINE  Demo Engine                ARCHIVE    *SAME
     DENSOIVENG  Denso-Diam iView Engine    ARCHIVIEW  OFERRER
     GRABBERENG  Grabber Form               ANGUYEN    QGPL
     HOPINVENG   Hops Invoice Engine        ARCHIVE    OFERRER
     IVIEWSEVER  Testing iView Server                  *LIBL
     IVIEWSEVE2  Testing iView Server       IVWARCH    *SAME
     IVIEWSRV1   Testing iView Server       GRABBER    *SAME
                                                                        More...
  F3=Exit   F5=Refresh   F6=Add
Select the appropriate engine with option 1:
  8/30/18                          iView                              IV2000C2
 10:39:58                    Engine Maintenance                       KKRAMER

 Edit Engine . . . . . . . . . : BOYDIVWENG Boyd Check iView Engine
 Spool File Endpoint . . . . . : OFERRER    / ARCHIVIEW  Name
 Data Queue. . . . . . . . . . : QUSRSYS    / BOYDIVWDTQ
 Engine processing log : N Y/N
 Process SPLF in Separate Job: N Y/N
   Job Queue / Library:            / *LIBL       Job Priority: *JOBD
    AND   ----- Originating -----   Spool        Spool        Archive
    OR    Library      Queue Name   Attribute    Value        Application
          OFERRER      ARCHIVE2     *SPLFILE     AP290A#      BOYDCHECK


                                                                        More...
  F3=Exit   F10=Save   F12=Cancel
- Archive Original Spool File To: This is the endpoint for the original spool file.
- Data Queue: Provide a name and library for the engine's data queue. This must be unique. The engine will create it if it is not present at engine startup. A dataqueue is a filesystem object.
- Originating Outqueue and Library: This is the monitored outqueue. Note that you can not have multiple dataqueue engines monitoring one outqueue.
- Spool Attribute: Specify the external spool file attribute to test to recognize the spool file and select the correct archive application. Specify one of:
| *FORM | Original Spool Form Type |
| *USRPRF | User Profile of Spool |
| *JOBNAME | Job Name of the Spool |
| *SPLFILE | Print File Name |
| *USRDTA | User data Value in Spool |
* Spool Value: Specify the specific value to test the selected external spool file attribute against.
- Archive Application: Prompt for and select the archive application to process the spool file for which the specified external spool file attribute matches the provided value.
You can have an unlimited number of engines in iView. You may define up to 9,999 engines in this dialog.
Use option 8 and 9 to start and stop the engines:
                         Start iView Server (STRIVWSRV)

 Type choices, press Enter.

 iView Server Name  . . . . . . . > IVIEWSEVER    Value, or F4 for list
 User . . . . . . . . . . . . . .   *CURRENT      Name, IVIEW, *CURRENT
 Job queue  . . . . . . . . . . .   *JOBD         Name, *JOBD
 Save job log . . . . . . . . . .   *NO           *YES, *NO


                                                                         Bottom
 F3=Exit   F4=Prompt   F5=Refresh   F12=Cancel   F13=How to use this display
 F24=More keys
- User: user profile to run the engine. This profile must have *JOBCTL and *SPLCTL authority, and if it is running iDocs merges must also have a profile define in the system directory.
- Job Queue: Job queue to which the engine is submitted. This can be any queue leading to a batch subsystem.
- Save Job Log: If you want the log saved, enter *YES. In normal production this would not be necessary.
[ Up To Index ]
