Table of Contents
[ Up To Index ]
Topics in Graphical Mapping With iMap
This portal section discusses specific topics in iMap, and the PC GUI mapper used with iDocs. The basic operation is discussed in the Quick Start Guide .
Map Spool Data with iMap
iMap - inFORM’s graphic spool data mapping utility - is one of the most powerfully unique tools available to import designed forms into the System i environment. iMap and iDocs driver install together with iMap software; users can print to the editable GUI mapping environment (iMap) from most any Windows design applications - including Word, PowerPoint, Adobe, Excel, and obviously inFORM’s Forms Designer.
Once the form overlay is designed, send the file to the iDocs print driver to transfer the form into the graphical mapping environment – iMap.
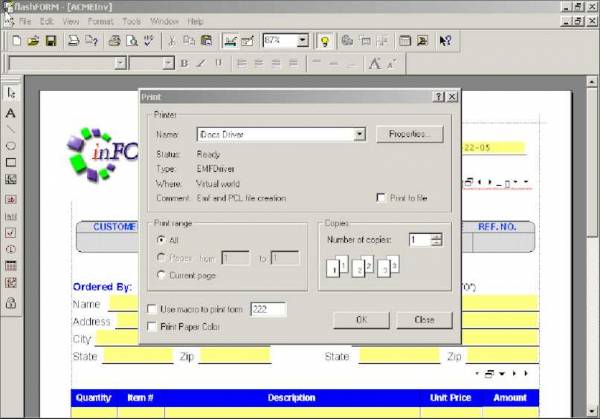
To do this, select File, then Print from the Designer’s pull-down menu. Choose the iDocs Driver from the list of printer drivers available, and click ok.
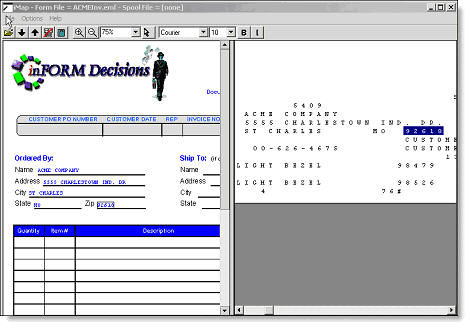
After selecting the iDocs Driver, this will spawn the iMap graphical mapping environment window. This will be a split screen (as shown below) whereby the designed form is on the left hand side, and the right hand side is the pane into which the iSeries spool file will be downloaded.
Mapping Spool file data to the form overlay using iMap
We now need to specify where we want our data (data from an iSeries spooled file) to appear on the form overlay. With iDocs, there are two methods by which we can achieve this link: (1) using our Graphical User Interface (GUI) mapper iMap, and (2) Coordinate Mapping – green screen data mapping method. This section will walk you through our most popular and elegant GUI mapping approach.
(See Configure Data Map for the green screen coordinate mapping option).
After iMap utility starts up, you will note the user-friendly split screen display interface allows you to view the spool file and the form overlay side-by-side.
Choose option Download Spool File from the File menu to download the spool file that you would like mapped to the form you have designed, or click on the DOWN ARROW. Once the spool file is downloaded it displays on the right side of the screen.
Mapping Fields: Specifying where the data from your spool file should appear on the form overlay is simple. Move the mouse across desired spool file data to highlight, then drag & drop the data into your form overlay. This will populate the area in which you want the data to appear on the form overlay.
Changing fonts: Once you have placed the data at the appropriate spots on the form overlay, you can change the fonts of these fields by right clicking on them and choosing Properties.
Upload map file and designed form to the iSeries
Now, it‘s time to transfer the map file and the form overlay that we have just created, to the iSeries. To do this, choose option Upload Form Map from the File menu of iMap, or click on the Up Arrow.
You will be presented with a sign-on window for the iSeries. Enter the IP address of the iSeries, and your iSeries user ID and Password, and click Connect.
You will then be prompted to enter an application name or to select from a list of previously defined form application projects. This is the name under which all the work you have, and will do, to this Forms Application Project will be named as on the PC and on the iSeries host. Example; invoice, check, stmt, etc…
iMap gives the user the flexibility of just uploading the Data map or just the Form overlay or both. This can be used to print just the data without the form overlay (report formatting for example) or print just the form overlay without the data.
For this walkthrough exercise, select both the Upload Map & Upload Form boxes. Specify a name for the map file and a name for the form overlay, if you want the name different. Remember, these are the names by which the files will be saved and recognized on the iSeries.
Importing Existing Mapping From the System i Server
You can download mapping from the server to iMap.
Prerequisites
- iDocs 4.02 updated with iMap 1.6.46a objects, or a later version of iDocs.
- iMap 1.6.46a or later.
Procedure
- Start iMap from the Windows Start button.
- Open an existing iMap project, or individually open a form and spool file. The form must have been saved to PC disk. The spool file can be opened from the pc or downloaded from the System i server.
- From the pulldown menu, select File then Download Map File.
- Select an existing form application from the pull down list.
Notes
- Downloading mapping ill suited to the form and spool file page open, for example with different page orientations or different page sizes, can cause unpredictable results.
- Special check mapped fields CHECK# and CHECK$ can only be imported into iMap if they were first uploaded from iMap 1.6.46a or later to iDocs 4.02 updated or later.
- Other special mapped fields are not supported at this time.
Downloading the Map File from the IBM i Server
When exporting the mapping from the IBM i into iMap (pull down menu File - Download Map File) it is necessary to unload the configuration file. You can do this by deleting the configuration rules and then saving the no-rules configuration as a different adjustments file.
[ Up To Index ]


